jeff joseph -- woodworker
handcrafted furniture from sustainably managed woodlands
THE FINE ART OF PLANEMAKING
Over the years I have collected a large array of handplanes, in a variety of shapes and sizes to accommodate different types of work. In addition to their obvious visual differences, they all have differing ‘personalities’ in terms of how they feel in my hands, how they respond in use, how readily they can be tuned, and the degree of precision they can provide.
While there are countless styles of planes available to create and smooth all kinds of mouldings and shapes, my use of handplanes is primarily limited to creating flat, polished surfaces on the faces, edges, and ends of boards (and occasionally on curved surfaces). For me these planes can be divided into two basic categories: steel-bodied and wood-bodied.
Tuned and sharpened properly, each style can produce very fine work. While there are some woodworking purists out there who limit themselves to one or the other, I regularly use both in my shop with good results. But there is one major benefit to the wood-bodied planes—if you have a suitable blade on hand, you can make your own, customized to your hands, and your specific needs of the moment.
As I make preparations to venture into the world of acoustic steel string guitar building (admittedly a somewhat daunting prospect, even for a seasoned woodworker), I recently found myself in need of a long-bodied jointer plane to prepare the edges of bookmatched soundboards and backs; the extended length of a jointer plane allows it to create straight/flat edges versus just riding over irregularities on an edge or surface like a shorter bodied plane would. I already had one jointer in my collection, a big 19th century beech-bodied plane that I picked up really cheaply (was maybe $10 back 20 or so years ago) at a flea market, as it was in pretty rough shape.

I restored it to working order, though only in a cursory way, as I never replaced the broken rear handle (known as a ‘tote’) or cleaned it up beyond the bare minimum to make it functional. Despite their often poor condition, the big benefit of many of the planes from this era is that the quality of the steel in the blade is usually very good, and will take and hold a keen edge if sharpened properly. So this plane does perform, surprisingly well actually considering its condition, but is limited to doing rough work, as its painfully wide throat simply will not allow it to take controlled, fine shavings like a good plane should.


I briefly considered buying an iron-bodied jointer, but a new one from Lee Valley/Veritas or Lie Nielsen (my preferred plane manufacturers) would set me back $400-500, and would weigh in the neighborhood of 8+ pounds, making it more than a little cumbersome to use. A far cheaper—and ultimately more rewarding—option was to buy an appropriate blade and make one.
There are many ways to design and build a handplane. Traditional Japanese planes (known as ‘kanna’) are deceptively simple looking but very refined tools, with exceptional quality steel in the irons/blades. I considered going that route, but instead of reinventing that wheel for myself, I decided to go with a design that I have used in the past, which derives from the work of renowned woodworker James Krenov, and which due to its widespread use has come to be known as a ‘Krenov-style’ plane.
Krenov, who died in 2009 after a long career in cabinetmaking and woodworking instruction, was also the author of a number of highly influential books detailing his approach to working with wood, and most notably his philosophy of craftsmanship, with a primary focus on mindfulness, the quality of experience for the craftperson in the process of creating woodwork, and the merits of subtle, ‘quiet’ design and handwork accentuating the beauty and character of the wood itself.
In his first book, A Cabinetmaker’s Notebook, originally published in 1976, he spent a few pages describing the process that led him to begin making his own planes, and offered a couple of sketches showing some details critical to making them function properly. But the thing that struck me most when first reading this book many years ago were the pictures of the planes themselves, as they were were in and of themselves works of art, deliberately constructed not merely for their utility, but for the sleek, expressive grace of their design. THAT, like much of Krenov’s other work, really spoke to me—affirming that one could aspire to that high level of expressiveness in everything they create—and that utility and beauty are not mutually exclusive.
More recently, a former student of Krenov’s, David Finck, devoted an entire book to the subject of Krenov-style planes. Making and Mastering Wood Planes is aptly titled, as it is an exhaustive look at creating this style of plane, but also provides a wealth of information about how to sharpen and utilize them most effectively. For anyone relatively new to woodworking, I would highly recommend using this book to build your first plane, as there is a lot of nuance involved that a novice could easily overlook if left to his/her own devices, and it would be quite disheartening to work through this process only to end up with a plane-shaped paperweight. For those more seasoned in the craft of woodworking, the Finck book may provide a little too much detail, elaborately drawing out principles that you are already well versed in; for you the sketches in A Cabinetmakers Notebook might be enough to get you off to a good start. Or for something in between these two extremes, there are also a couple of well-written articles, one by David Finck, and another by David Welter, a long time instructor at Krenov’s school, that were published in Fine Woodworking magazine and can be found in the digital libraries on their website (October 1997, No. 126, pp. 64-73; February 2008, No. 196, pp. 72-77) detailing the essentials of the process in a streamlined way.
My first attempt at one of these planes was about a decade ago, when I made sort of an all-purpose mid-size smoothing plane out of a block of black locust salvaged from a pile of firewood.
It came out well enough, and has proved useful enough in the interim that I felt some confidence trying my hand at a larger version. There are a few factors critical to the success of this type of plane, starting with the materials themselves. First, a piece of well-seasoned, dense, stable hardwood is essential for the body, as if the sole does not remain flat, or wears unevenly, it cannot plane a surface flat, or with any degree of accuracy. If needed, the body can be glued up from smaller pieces of wood, but aesthetically I like the look and feel that comes from starting with a single large block. In addition to the plane body, there are two other wooden parts to the plane: the crosspin, and the wedge. The round crosspin tenons must fit snugly in their drilled holes, but still allow for some rotary movement, and the pin itself must be oriented very accurately in terms of being square with the blade, parallel with its face, and also at the proper height above the blade to hold it firmly in the proper position when the wedge is in place. The wedge itself must be flat on its faces and evenly tapered to hold the blade tightly to eliminate chatter when the plane is in use. The standard ramp angle for the blade to sit on is 45 degrees, with the opposing front block angled at about 62 degrees to allow clearance for the shavings to exit out the top of the block.
Next is the blade assembly, which consists of three parts: the blade itself, fabricated of high carbon hardened steel, the chip breaker, and a cap screw to hold the two together. The Finck book provides instruction in finding or repurposing an appropriate blade, and in making a matching chipbreaker if needed. The easier route (which I took each time) is to buy a pre-made blade assembly. I bought mine from Ron Hock; Lee Valley tools also sells their own version; each are great quality and are designed specifically for Krenov-style planemaking.

Here’s all six parts—body, crosspin, wedge, plane iron, chipbreaker, cap screw:

I ended up making this 19″ jointer out of white oak, as a few years prior I had set aside some large, straight-grained sections left over from a timber framing project. I partially milled the block to size, then put it away and forgot about it for a good while to let it fully air dry and acclimate to my shop’s relative humidity before working with it to ensure it stays stable once becoming a plane. The actual building of the plane was more enjoyable this second time around, as I was somewhat versed in the process, and so much less fearful of making mistakes. And another 10 years of woodworking experience didn’t hurt any. I still referred back to Finck’s book and/or the Fine Woodworking articles here and there just to ensure I was not going astray anywhere in the process.
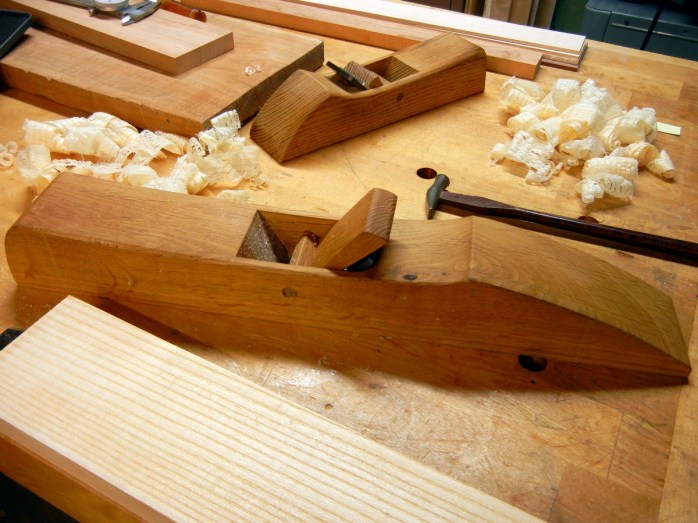
The real precision, the MOMENT OF TRUTH in this process comes when opening the throat on the plane’s sole just enough for the blade to protrude the correct distance for a fine cut (NOTHING like my old jointer plane), and also to minimize the risk of tearout in the wood being planed if a shaving gets caught there. Be very patient and take all the time needed with this stage, testing as you go, and if all else has gone well it will reward you with a degree of precision that easily rivals expensive iron-bodied planes. In the image below, the throat opening, where the cutting is taking place, and where the shavings exit, is the gap at the BOTTOM of the steel blade—maybe 1/64″ or so.

This is the goal—full width shavings that are whisper thin like this 0.001″ ash shaving:


A plane like this is a joy to use, and even with the dense oak body it weighs in at only 3 pounds, making it about 60% or so lighter than a comparable iron-bodied jointer. The light weight of this plane, and its responsiveness to the wood when in use, give it the feel of driving a sportscar, instead of a pickup truck (or in the case of my old wood jointer, maybe a dump truck).
The other big benefit was cost, as the oak was free, and the blade assembly cost me about $50. So about 10-15% of the cost of a comparable quality iron plane.
This would be a great project for any aspiring woodworker to test their skills while simultaneously developing an arsenal of personalized, high-precision tools. Tools that quietly go about their business of making whisper thin shavings, as opposed the noisy, dusty world that woodworkers by necessity spend so much time in. Be careful though, as if things go well it is habit forming—I already want to build another one. Or two.
Planes like these, that Krenov called “the cabinetmaker’s violin,” also serve to make a more intimate connection between the worker and the work, between you (or me) and the wood. Which is what an “impractical” woodworker like Krenov (or me) would tell you it’s really all about anyway….

