jeff joseph -- woodworker
handcrafted furniture from sustainably managed woodlands
FOR SALE: Figured Cherry Table Set – August 2023
As I imagine is true for many woodworkers, I have long been a hoarder of wood. On one hand, this is a great thing, as I always have an ample supply of unique, high quality lumber around, in a great variety of species and sizes to suit all kinds of different projects that may come along. The downside is that I never have enough space to store it all, so finding what I need, and keeping it all organized (and out of my way in my workshop) is a constant challenge.
In my attempts to maintain some semblance of order, and something of a mental inventory of what I do have on hand, I periodically try to go through all of my wood supply to see what I might either use, or maybe even cull out if I am feeling particularly frustrated by all the unsorted odds and ends that are left lying around, but that I have been too miserly to part with. For just one example, I just recently needed some quartersawn white oak to make some acoustic guitar side sets, and had a vague recollection that I had salvaged some oak flooring from a remodeling project that I worked on in Pacific Heights in San Francisco nearly thirty years ago. Yep, I still had them, after having moved them across the country, and out of my way probably dozens of times while they waited patiently to be put to use. A nice thing about wood is that if it is properly dried and stored, it will last indefinitely—it has no expiration date. In any case, it ended up being worthwhile, as it was some very nicely figured oak, and just what I needed, but I also recently parted with a number of stacks of cutoffs and scraps that I had carried around for that long or longer before finally giving up.
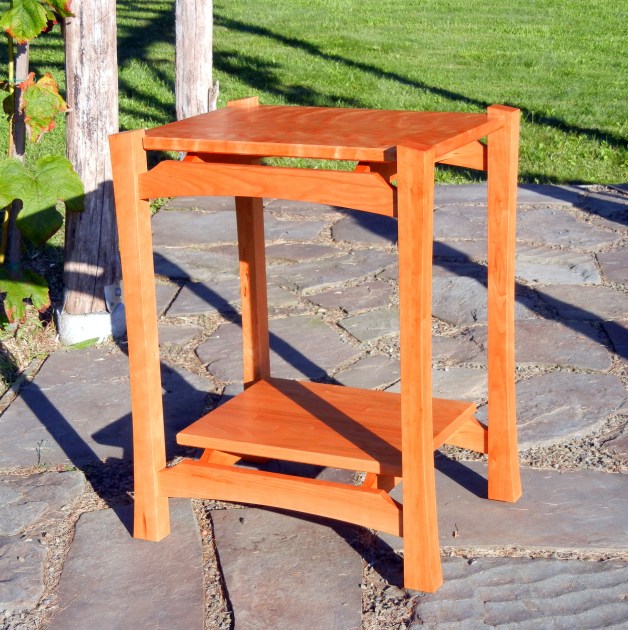
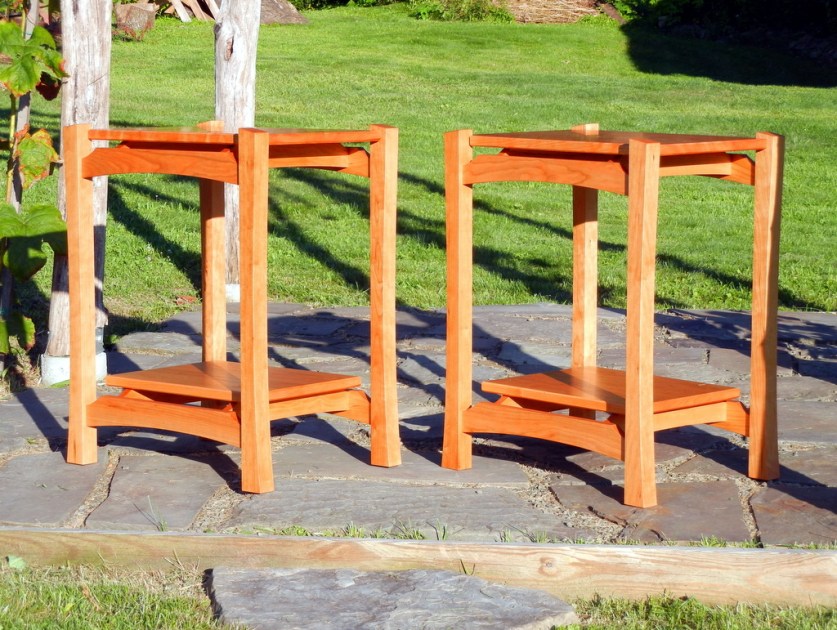
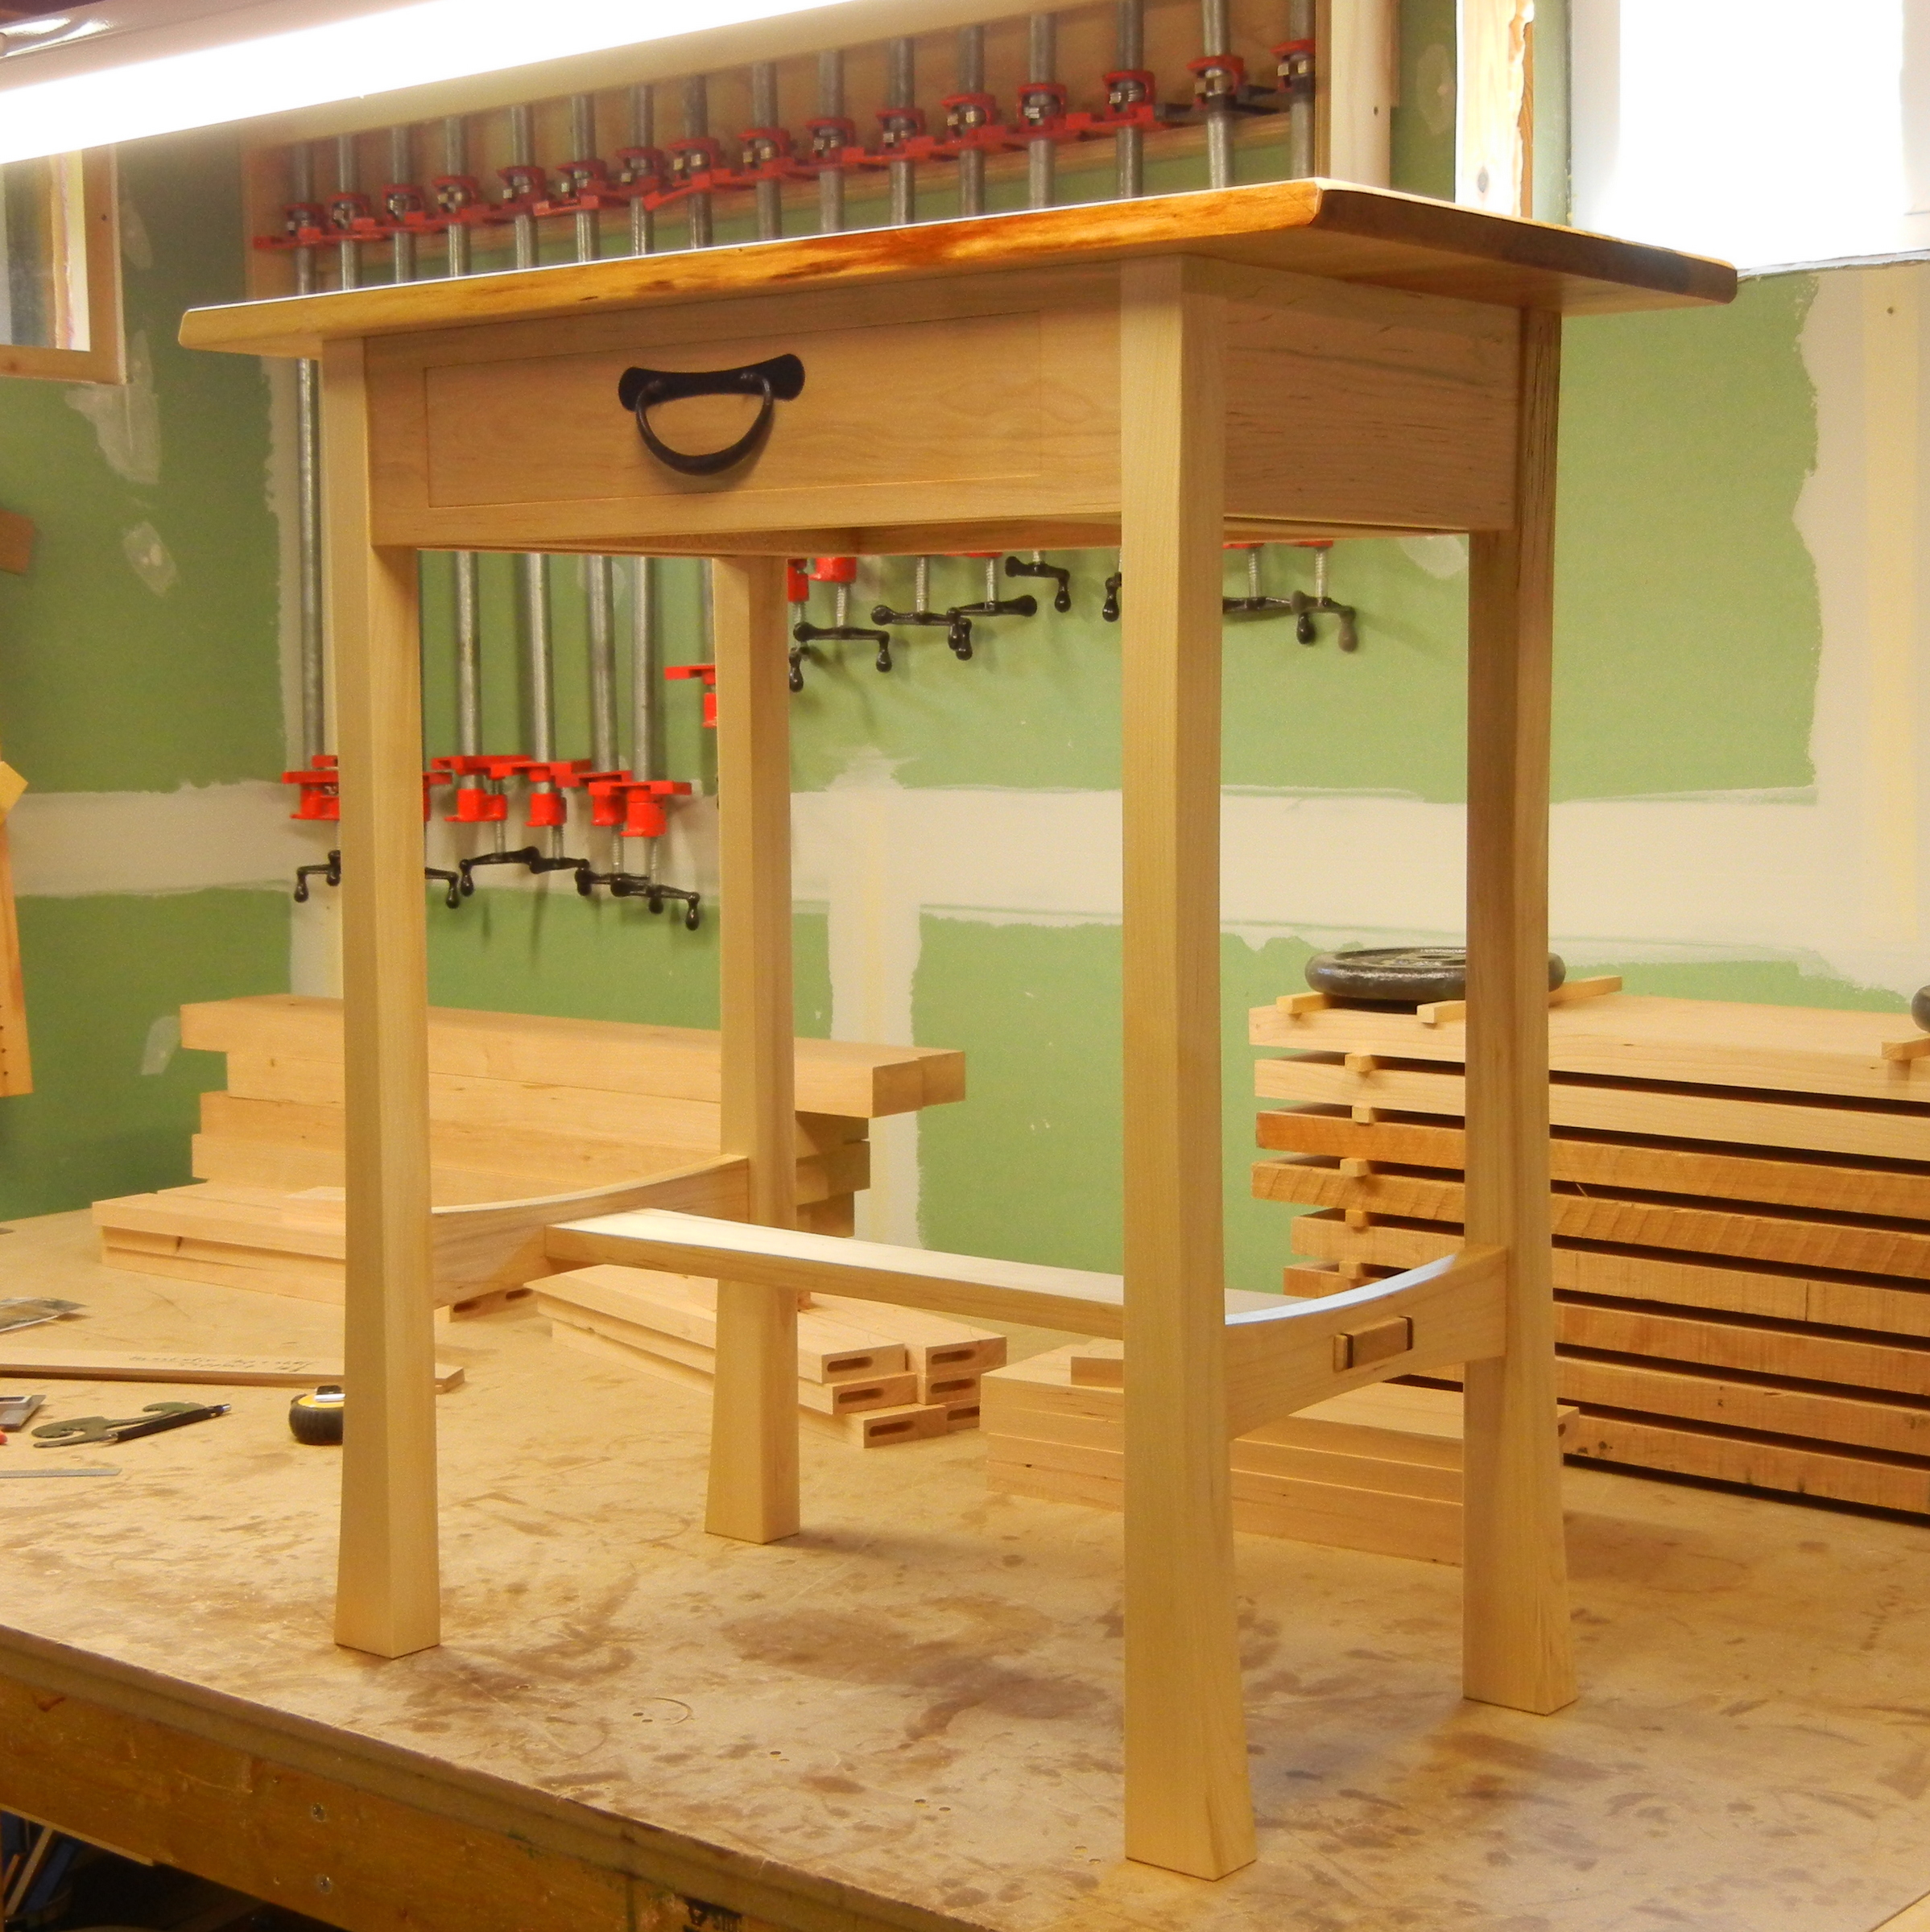
One of the primary competitors for space within my lumber storage room over the years has been finished pieces of furniture, which ideally have to be accessible for when a sale takes place, but most importantly, need to be well-protected so that they are not inadvertently damaged while in close proximity to multiple stacks of rough-sawn lumber. So, to finally get around to the purpose of this post, nearly ten years ago I had built a matching set of cherry tables, using some of the finest figured cherry I have ever seen. As I was quite busy at the time with other work, I did not end up selling the tables, and they ended up wrapped and stored in the back of my wood storage area. It was only in my most recent attempt at shifting things around to create more useable space that I finally pulled them out and am at long last again putting them up for sale.
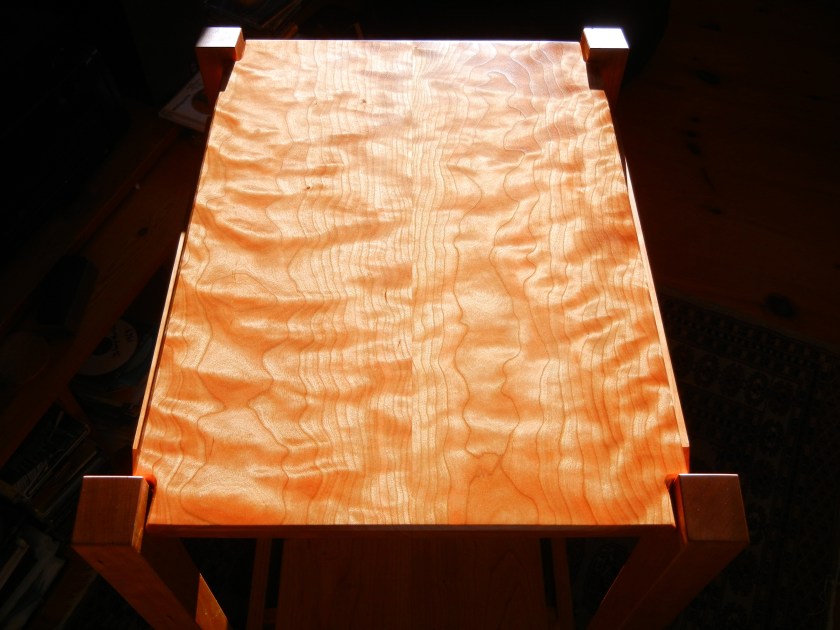
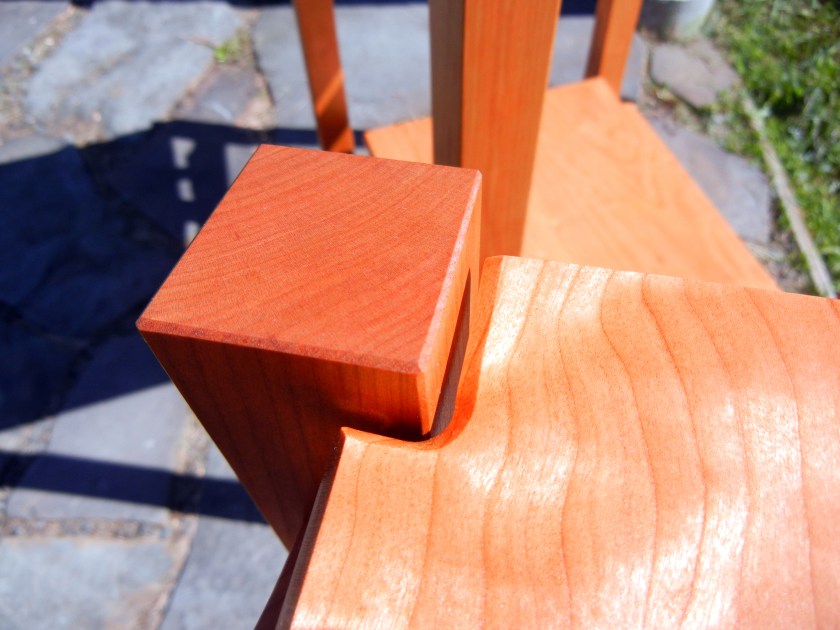
The design was a prototype that I based upon a single image I had seen and saved from a Fine Woodworking magazine dating back to the 70s or 80s, and which in a recent search I have not been able to find again. As the image was small, and not very detailed, I had to fill in the blanks with my own concept of what these tables wanted to be, and after all this time I remain very pleased with how these turned out. So with my thanks to the unknown craftsman who provided the initial inspiration, here are the basic specs: (2) matching tables in solid cherry, each with a low shelf; the finish is hand-applied polyurethane, lightly applied so as to preserve the tactile feel and natural look of the wood itself. The dimensions of each are 24″ long x 18.75″ wide x 31″ tall.
The price is $1900 each, or $3600 for the set (which is how I would prefer to sell them). Local delivery (within 100 miles of 13864) is possible for an additional fee. Shipping is also possible, with crating, shipping, and insurance to be calculated at the time of sale. Feel free to inquire with any questions you may have, or if you would like to purchase one or both of these unique designs, as it is long past time that I found these a good home…and of course I need the space.
Images:


NASHI

I have a confession to make. Not a very consequential one in the scheme of things, but one that surprises me nonetheless, and that I feel strangely guilty about. Here it is: I like Asian pears more than apples.
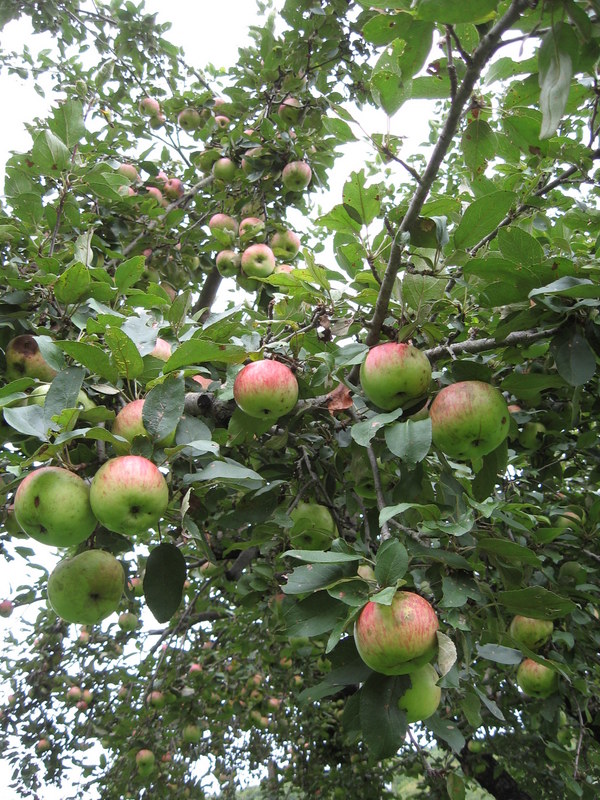
OK, I said it. The reason it is so surprising to me, and why I feel hesitant to admit it to myself, is that I have been an apple lover all my life. I was the kid who always had an apple in his lunchbox, and was actually happy about it. I’ve always been an “apple a day keeps the doctor away” guy as long as I can remember, and since I bought land and started my own orchard 20 years ago, I have grown and tasted dozens of heirloom apple varieties, and, weather permitting, have stored enough each fall to last me at least nine months of the year, while in the remaining three have gotten my fix from home canned apple sauce and dried apples.
Which is why I feel strangely disloyal in making this confession, but I think it’s true, and the reason I know it is this: If I eat an apple, say an Ashmead’s Kernel, York Imperial, or Kidd’s Orange Red, which are three of my favorites from my orchard, I find it delicious, and am thoroughly contented. BUT, if I eat an Asian pear, THEN eat one of those apples, I am left strangely dissatisfied—and in times where I have had bags of both Asian pears and apples stored in the fridge, I have repeatedly found myself eating all the pears before coming back around to the apples—and am left feeling like I have shamefully strayed from a long-term relationship.
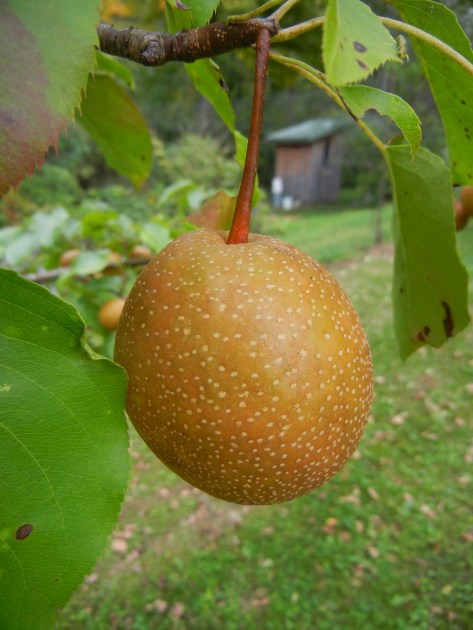
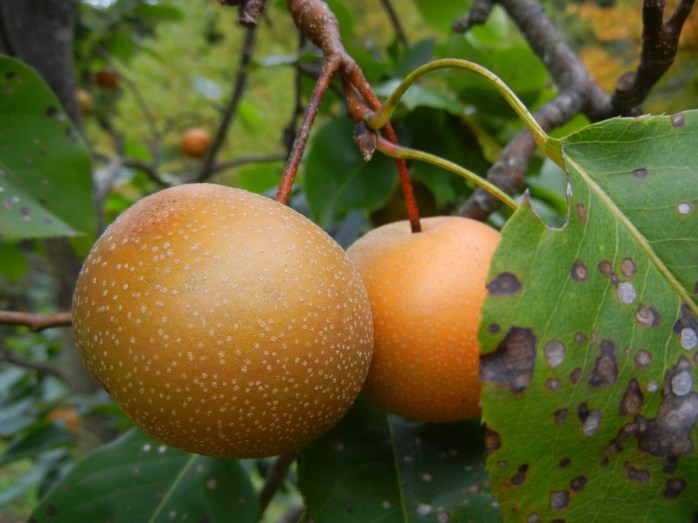
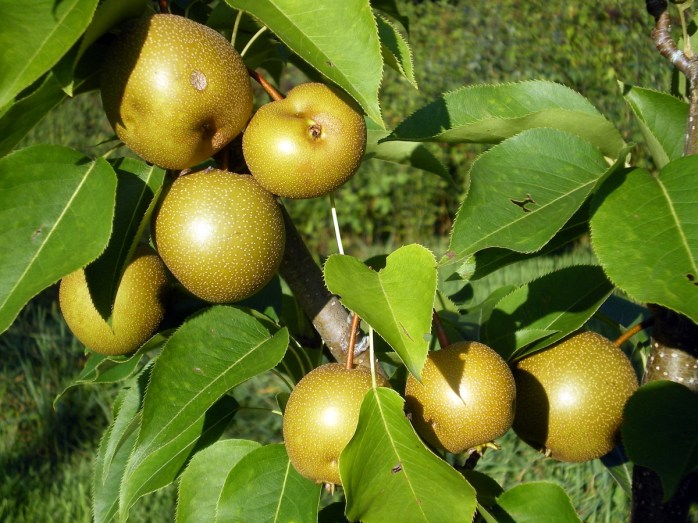
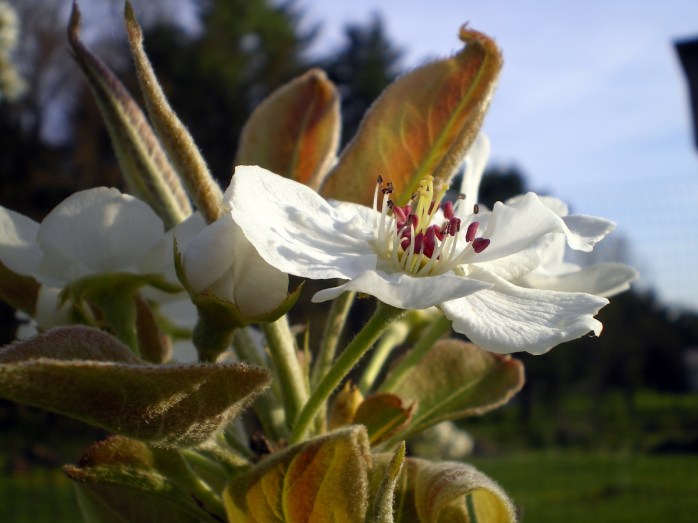
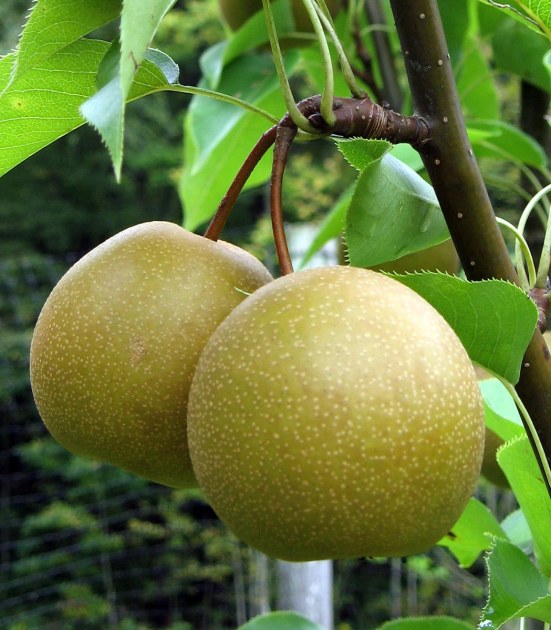
If you’ve never experienced an Asian pear (known as ‘nashi’ in Japanese) for yourself, they are quite distinct from either apples or our more common European pears in texture, flavor, and scent. A good, ripe one will be very crisp and juicy, kind of grainy-textured in a pleasant way (very unlike the dry texture of an apple, or the buttery texture of a European pear), and mildly to more intensely sweet depending on the cultivar, but balanced with a subtle tartness that becomes more and more prominent as you eat your way to the core. The sweetness never becomes cloying, like many modern apple varieties seemingly bred to simulate candy, and their watery juiciness serves to dilute the sweetness to a perfect balance with the tangy tartness that to me is their most redeeming quality. There are often hints of butterscotch or vanilla in the flavor and/or aroma. They are usually peeled, due to the thick, dry skin of many varieties, but I find it quite pleasant to eat them whole. Visually, they are also quite distinct, with most common varieties here in the U.S. being either round or oblong, and sometimes quite large, with skin ranging from pale yellow or green to deep copper in color, often with prominent lenticels, and long, curved stems, like this Seuri:
The seeds are dark brown to jet black.
Asian pears are native to China and Japan. They first came to the U.S. in the 1850’s with the Chinese labor force working in California during the gold rush. Along with European pears, they belong to the Pyrus genus, and are divided into a few different species, with the most common being P. pyrifolia (referring to their round shape), along with the less common P. bretschneideri, which are native to northern China and are tapered toward the stem more like a European pear. In addition to their excellent flavor, there are a number of other characteristics of nashi that make them a great addition to a home orchard:
- They tend to be far less susceptible to insects and disease than apples and European pears, making them a great choice for an organic grower; a few varieties are known to be susceptible to fireblight, though I haven’t had any significant blight on my trees to date. The biggest problem I have with certain varieties are dimpled or misshapen fruit, which is caused by early season feeding or egg laying by plum curculio, tarnished plant bug, and/or the brown marmorated stink bug. As this damage is cosmetic only, and the fruit remains edible, it is of no real consequence for the home orchardist;
- The trees are precocious, bearing early and heavily thereafter. Unlike some apples, they have shown no sign of biennial bearing (taking a year off after a bumper-sized crop). Most varieties of Asian pears bear so heavily that they actually benefit greatly from early season thinning, as it increases fruit size and quality;
- The trees are at least somewhat self-fertile, though they will crop most consistently with the presence of other pears with a similar bloom time for best cross-pollination. European and Asian pears are close enough relatives that they will pollinate each other, and Asian pears can be grown on the common rootstocks used for European pears—all my Asian pears are grafted on Old Home x Farmingdale 87 (OHxF 87), which is a semi-dwarf, fireblight resistant pear rootstock;
- Asian pears ripen on the tree. Unlike some European pears, which need to be harvested early and put in cold storage for a period of time in order to ripen properly, nashi ripen fully on the tree, and are ready for immediate consumption when picked. Most nashi varieties, like the Bartlett pear, display a distinct change in skin color when fully ripe, which makes it easy to determine when to harvest. They often ripen sequentially, rather than all at once, so a prolonged harvest is possible;
- The trees are generally cold hardy from USDA hardiness zones 5 through 9, though this will vary by cultivar. When I first planted Asian pears they were considered marginal for my zone 5b location in upstate New York (average low of -10 to -15 degrees F); we have gotten as low as -18 degrees F here, and the trees have not suffered at all as a result. That being said, some varieties will fruit better and will definitely taste better in some microclimates than others, so it would be of benefit to see what varieties others in your immediate vicinity are having success with;
- There are early/mid/late season varieties to select from, so you can harvest nashi all the way from late-July thru November depending on your location; there are also a number of varieties that are excellent keepers, lasting in cold storage for up to six months or so with a minimal loss in quality;
- Like other Pyrus, they generally grow in a columnar shape, with a strong central leader and short, upright side branches, so they take up less space and can be planted closer together in an orchard setting;
- They bloom early, so have a long growing season, which can occasionally be a problem in years with late spring frost;
- Like apples, Asian pears are equally useful fresh, dried, made into sauce, or even for vinegar.
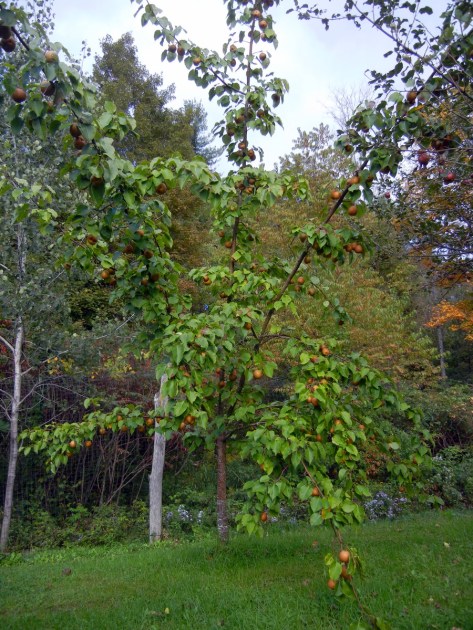
At present I am growing seven different varieties: Chojuro, Olympic (also known as Korean Giant), Seuri, Yoinashi, Shinko, Hosui, and Shinsui. Of these I have as yet tasted the fruit of only five, as the Shinko and Yoinashi are recent additions to my orchard. Of the varieties that have borne fruit, I like them all for different reasons, but if pressed to choose only one, it would be Chojuro, as it has been the most consistent producer, keeps very well in storage, ripens to the most beautiful color, and has a very distinct butterscotch note in its flavor. One thing I will say for sure is that I want to grow more of them.
THE FINE ART OF PLANEMAKING
Over the years I have collected a large array of handplanes, in a variety of shapes and sizes to accommodate different types of work. In addition to their obvious visual differences, they all have differing ‘personalities’ in terms of how they feel in my hands, how they respond in use, how readily they can be tuned, and the degree of precision they can provide.
While there are countless styles of planes available to create and smooth all kinds of mouldings and shapes, my use of handplanes is primarily limited to creating flat, polished surfaces on the faces, edges, and ends of boards (and occasionally on curved surfaces). For me these planes can be divided into two basic categories: steel-bodied and wood-bodied.
Tuned and sharpened properly, each style can produce very fine work. While there are some woodworking purists out there who limit themselves to one or the other, I regularly use both in my shop with good results. But there is one major benefit to the wood-bodied planes—if you have a suitable blade on hand, you can make your own, customized to your hands, and your specific needs of the moment.
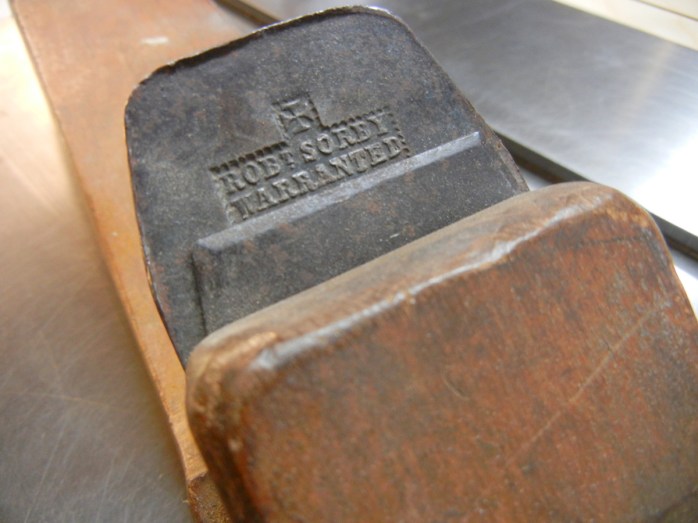
As I make preparations to venture into the world of acoustic steel string guitar building (admittedly a somewhat daunting prospect, even for a seasoned woodworker), I recently found myself in need of a long-bodied jointer plane to prepare the edges of bookmatched soundboards and backs; the extended length of a jointer plane allows it to create straight/flat edges versus just riding over irregularities on an edge or surface like a shorter bodied plane would. I already had one jointer in my collection, a big 19th century beech-bodied plane that I picked up really cheaply (was maybe $10 back 20 or so years ago) at a flea market, as it was in pretty rough shape.
I restored it to working order, though only in a cursory way, as I never replaced the broken rear handle (known as a ‘tote’) or cleaned it up beyond the bare minimum to make it functional. Despite their often poor condition, the big benefit of many of the planes from this era is that the quality of the steel in the blade is usually very good, and will take and hold a keen edge if sharpened properly. So this plane does perform, surprisingly well actually considering its condition, but is limited to doing rough work, as its painfully wide throat simply will not allow it to take controlled, fine shavings like a good plane should.
I briefly considered buying an iron-bodied jointer, but a new one from Lee Valley/Veritas or Lie Nielsen (my preferred plane manufacturers) would set me back $400-500, and would weigh in the neighborhood of 8+ pounds, making it more than a little cumbersome to use. A far cheaper—and ultimately more rewarding—option was to buy an appropriate blade and make one.
There are many ways to design and build a handplane. Traditional Japanese planes (known as ‘kanna’) are deceptively simple looking but very refined tools, with exceptional quality steel in the irons/blades. I considered going that route, but instead of reinventing that wheel for myself, I decided to go with a design that I have used in the past, which derives from the work of renowned woodworker James Krenov, and which due to its widespread use has come to be known as a ‘Krenov-style’ plane.
Krenov, who died in 2009 after a long career in cabinetmaking and woodworking instruction, was also the author of a number of highly influential books detailing his approach to working with wood, and most notably his philosophy of craftsmanship, with a primary focus on mindfulness, the quality of experience for the craftperson in the process of creating woodwork, and the merits of subtle, ‘quiet’ design and handwork accentuating the beauty and character of the wood itself.
In his first book, A Cabinetmaker’s Notebook, originally published in 1976, he spent a few pages describing the process that led him to begin making his own planes, and offered a couple of sketches showing some details critical to making them function properly. But the thing that struck me most when first reading this book many years ago were the pictures of the planes themselves, as they were were in and of themselves works of art, deliberately constructed not merely for their utility, but for the sleek, expressive grace of their design. THAT, like much of Krenov’s other work, really spoke to me—affirming that one could aspire to that high level of expressiveness in everything they create—and that utility and beauty are not mutually exclusive.
More recently, a former student of Krenov’s, David Finck, devoted an entire book to the subject of Krenov-style planes. Making and Mastering Wood Planes is aptly titled, as it is an exhaustive look at creating this style of plane, but also provides a wealth of information about how to sharpen and utilize them most effectively. For anyone relatively new to woodworking, I would highly recommend using this book to build your first plane, as there is a lot of nuance involved that a novice could easily overlook if left to his/her own devices, and it would be quite disheartening to work through this process only to end up with a plane-shaped paperweight. For those more seasoned in the craft of woodworking, the Finck book may provide a little too much detail, elaborately drawing out principles that you are already well versed in; for you the sketches in A Cabinetmakers Notebook might be enough to get you off to a good start. Or for something in between these two extremes, there are also a couple of well-written articles, one by David Finck, and another by David Welter, a long time instructor at Krenov’s school, that were published in Fine Woodworking magazine and can be found in the digital libraries on their website (October 1997, No. 126, pp. 64-73; February 2008, No. 196, pp. 72-77) detailing the essentials of the process in a streamlined way.
My first attempt at one of these planes was about a decade ago, when I made sort of an all-purpose mid-size smoothing plane out of a block of black locust salvaged from a pile of firewood.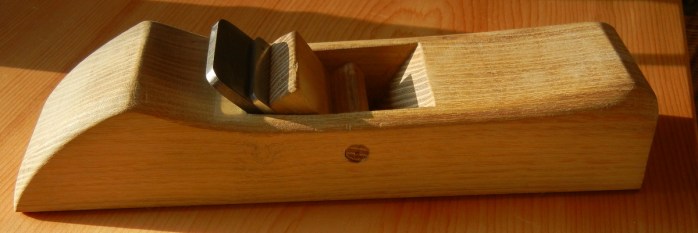
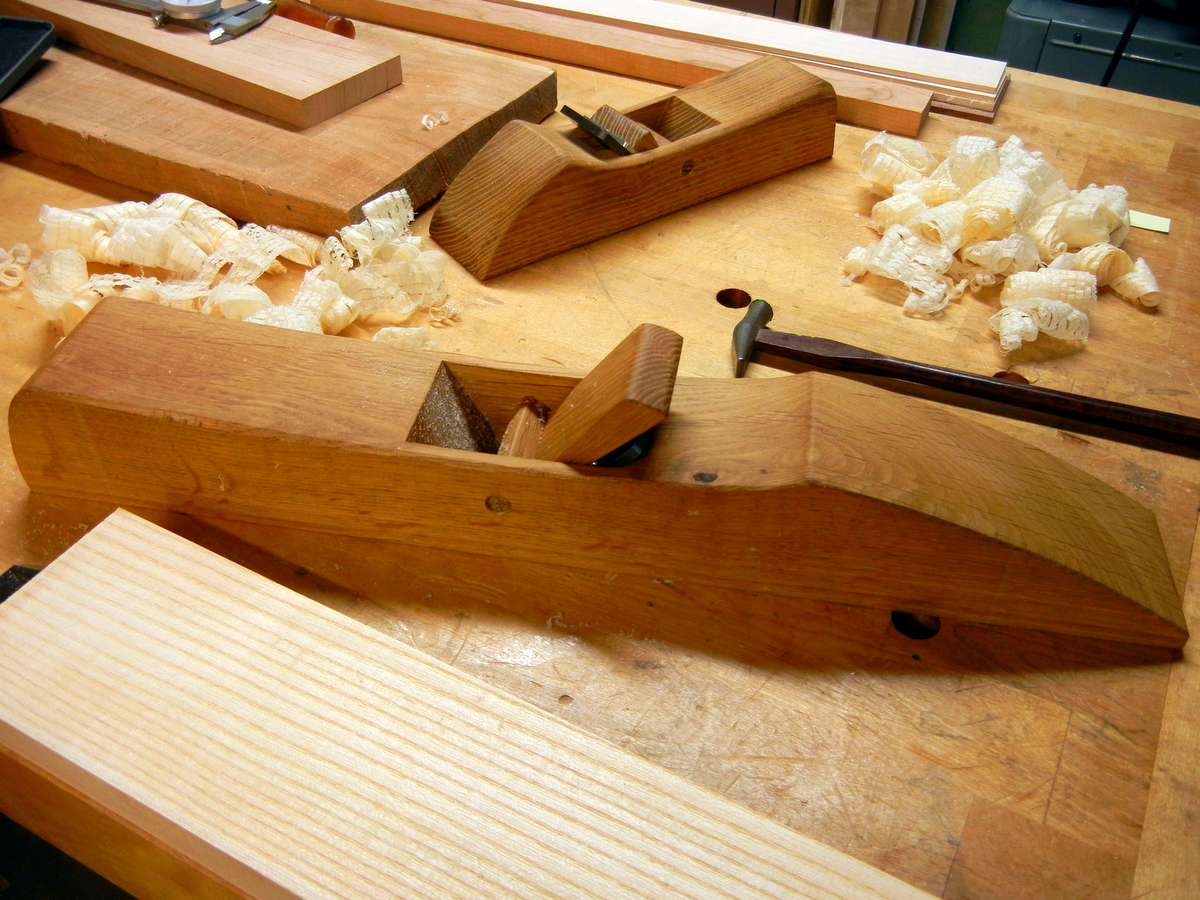
It came out well enough, and has proved useful enough in the interim that I felt some confidence trying my hand at a larger version. There are a few factors critical to the success of this type of plane, starting with the materials themselves. First, a piece of well-seasoned, dense, stable hardwood is essential for the body, as if the sole does not remain flat, or wears unevenly, it cannot plane a surface flat, or with any degree of accuracy. If needed, the body can be glued up from smaller pieces of wood, but aesthetically I like the look and feel that comes from starting with a single large block. In addition to the plane body, there are two other wooden parts to the plane: the crosspin, and the wedge. The round crosspin tenons must fit snugly in their drilled holes, but still allow for some rotary movement, and the pin itself must be oriented very accurately in terms of being square with the blade, parallel with its face, and also at the proper height above the blade to hold it firmly in the proper position when the wedge is in place. The wedge itself must be flat on its faces and evenly tapered to hold the blade tightly to eliminate chatter when the plane is in use. The standard ramp angle for the blade to sit on is 45 degrees, with the opposing front block angled at about 62 degrees to allow clearance for the shavings to exit out the top of the block.
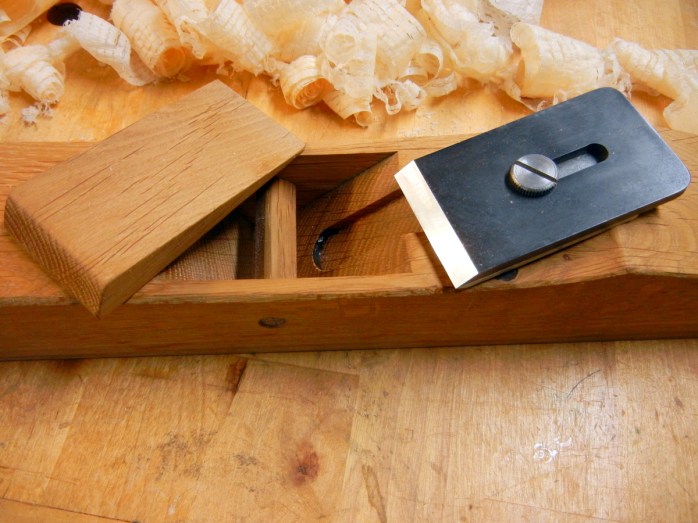
Next is the blade assembly, which consists of three parts: the blade itself, fabricated of high carbon hardened steel, the chip breaker, and a cap screw to hold the two together. The Finck book provides instruction in finding or repurposing an appropriate blade, and in making a matching chipbreaker if needed. The easier route (which I took each time) is to buy a pre-made blade assembly. I bought mine from Ron Hock; Lee Valley tools also sells their own version; each are great quality and are designed specifically for Krenov-style planemaking.

Here’s all six parts—body, crosspin, wedge, plane iron, chipbreaker, cap screw:
I ended up making this 19″ jointer out of white oak, as a few years prior I had set aside some large, straight-grained sections left over from a timber framing project. I partially milled the block to size, then put it away and forgot about it for a good while to let it fully air dry and acclimate to my shop’s relative humidity before working with it to ensure it stays stable once becoming a plane. The actual building of the plane was more enjoyable this second time around, as I was somewhat versed in the process, and so much less fearful of making mistakes. And another 10 years of woodworking experience didn’t hurt any. I still referred back to Finck’s book and/or the Fine Woodworking articles here and there just to ensure I was not going astray anywhere in the process.
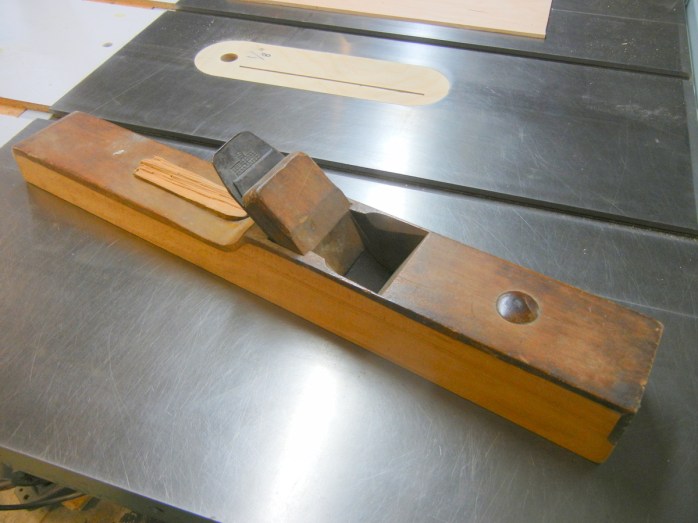
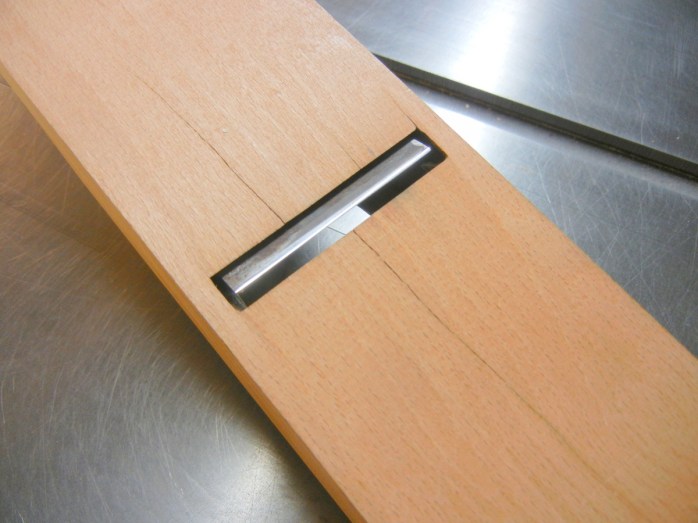
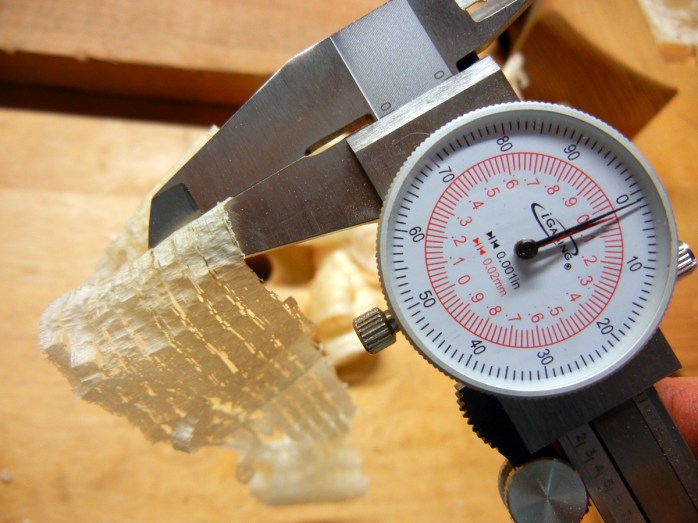
The real precision, the MOMENT OF TRUTH in this process comes when opening the throat on the plane’s sole just enough for the blade to protrude the correct distance for a fine cut (NOTHING like my old jointer plane), and also to minimize the risk of tearout in the wood being planed if a shaving gets caught there. Be very patient and take all the time needed with this stage, testing as you go, and if all else has gone well it will reward you with a degree of precision that easily rivals expensive iron-bodied planes. In the image below, the throat opening, where the cutting is taking place, and where the shavings exit, is the gap at the BOTTOM of the steel blade—maybe 1/64″ or so.
This is the goal—full width shavings that are whisper thin like this 0.001″ ash shaving:
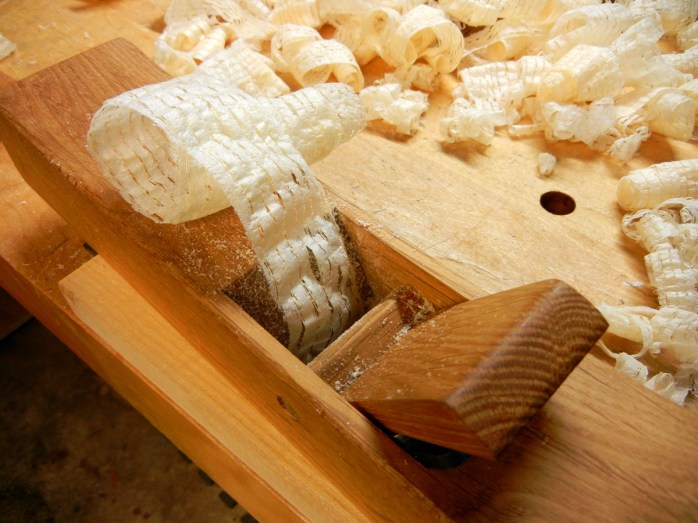
A plane like this is a joy to use, and even with the dense oak body it weighs in at only 3 pounds, making it about 60% or so lighter than a comparable iron-bodied jointer. The light weight of this plane, and its responsiveness to the wood when in use, give it the feel of driving a sportscar, instead of a pickup truck (or in the case of my old wood jointer, maybe a dump truck).
The other big benefit was cost, as the oak was free, and the blade assembly cost me about $50. So about 10-15% of the cost of a comparable quality iron plane.
This would be a great project for any aspiring woodworker to test their skills while simultaneously developing an arsenal of personalized, high-precision tools. Tools that quietly go about their business of making whisper thin shavings, as opposed the noisy, dusty world that woodworkers by necessity spend so much time in. Be careful though, as if things go well it is habit forming—I already want to build another one. Or two.
Planes like these, that Krenov called “the cabinetmaker’s violin,” also serve to make a more intimate connection between the worker and the work, between you (or me) and the wood. Which is what an “impractical” woodworker like Krenov (or me) would tell you it’s really all about anyway….
red maple

Every so often I write for The New York Forest Owner, the magazine of the New York Forest Owners Association (NYFOA). The text below is verbatim from my most recent contribution, though I’ve added a few images and some brief commentary at the end that were not part of the original piece.
The title is Reconciling with Red Maple, and while it was written specifically for a New York audience, much of the information is relevant across the entire range of the species, which is pretty much everywhere east of the Mississippi, and sporadically beyond heading westward:
Each year, I devote a week to thinning my woodlot—cutting mostly firewood, along with some shiitake bolts and the occasional sawlog. Real poor quality stuff just stays where it falls to feed the soil and provide habitat. While I very much enjoy the ‘work’ (felling trees is fun in my book), my favorite part of the process comes at the end, when I get the chance to walk around without a chainsaw, and unencumbered by safety gear, just looking around to assess the results of that year’s efforts.
Thirteen years ago when I started working on this piece of property, the stocking was so dense that I could barely catch a glimpse of the dominant crowns, as they were almost always obscured by the suppressed understory trees, which in my case were mostly diseased beech. After years of dogged thinning, what once seemed to be a beech forest punctuated by an occasional maple has now begun to feel like a maple-dominant forest with some patchy beech problems.
As I cut more each year, I also learned more about the timber market, and so was initially dismayed to discover that while sugar maple is scattered throughout my woodlot, it is by far outnumbered by its less well-regarded cousin, red maple, which is very well represented here, from seedlings all the way through large mature stems. Over the years I have also had the opportunity to meet many fellow woodlot owners, a number of whom have seemed almost embarrassed to admit that red was the predominant maple in their woodlots as well: “Yeah, well, you know, I’ve only got red maples….” seemed to be a common refrain expressed by many of my peers, while they all but hung their heads in shame.
I felt much the same way until I accepted the fact that it is likely the best thing I will have to work with in many of my stands, and that after beech (which I am working to eradicate) it will be one of the species most likely to regenerate successfully.
So having reconciled myself to the fact that my woodlot really seems to want to grow red maple, and having noticed that it seems to be very competitive in all types of environments, I became curious about why this might be so and decided to do some research about the history and status of Acer rubrum in New York state. The following is a synopsis of what I’ve learned, and how, despite its often maligned character, I’ve gained a new appreciation and respect for red maple.
First, some population statistics:
- Among trees 5” dbh and larger, red maple is the most numerous tree species in New York state;
- Among trees 15” dbh and larger, it is our second most numerous (trailing only white pine);
- It is our second most numerous sapling (1-4.9” dbh) after beech, and is the 4th most numerous seedling;
- Its dominance is near statewide, as it ranks first in six of the eight inventory units (is 2nd in Capitol district, and 5th in the Eastern Adirondack unit);
- Extending beyond New York, red maple is the most abundant and widespread tree of eastern North America, inhabiting nearly the entire landmass east of the Mississippi, and occurring in 54 distinct forest-cover types.
And a few key aspects of red maple ecology:
THE GOOD:
- high shade tolerance, though less than sugar maple/beech/hemlock; generally gives way to the more tolerant hardwoods after about 80 years;
- vigorous seeder: large seed crop almost every year; seed matures and drops April-July; can form near pure stands on old fields; seed is lightest in weight of all maples, and is dispersed by wind, so can travel far from parent trees; trees reach sexual maturity at young age (4-10 years);
- very fast growing, especially when young;
- responds well to thinning;
- lateral or taprooted–tolerant of dry/upland sites and wet/swampy/flooded soils;
- very vigorous stump sprouter; 2nd growth stands are often of sprout origin; responds quickly after disturbance;
THE NOT SO GOOD:
- minimal resistance to decay, often subject to butt rot and various cankers;
- sensitive to wounding, slow to callus/heal wounds;
- often of poor/defective growth form, especially on poor quality sites, or in multi-stemmed trees of sprout origin;
- thin bark offers little to no resistance to fire damage;
- buds and foliage are a preferred deer browse;
- softer/lighter/weaker wood than sugar maple;
While the above list is a mixed bag of good and bad, based upon the population numbers red maple is clearly a tree with a successful strategy for outcompeting most of its neighbors in our neck of the woods (so to speak). Perhaps surprisingly, this was not in any way a foregone development, as early survey records show that red maple was only a minor component of most of the precolonial forestland of New York and the northeast.
So why is it so successful now? The answers that I found can be divided into two basic categories: 1) attributes of the tree itself; and 2) the nature of how we have managed (or not managed) the forests around those trees.
With regards to the tree itself, the key to its success seems to be its amazing adaptability—red maple has been called a “supergeneralist,” and has demonstrated the ability to grow on a wider range of soils (type/texture/moisture levels/pH) and elevation than perhaps any other tree species in North America. Whereas sugar maple will thrive and outcompete red on the best quality sites, and has higher tolerance so will outlive red in ‘climax’ type/uneven-aged stands, red maple is content to take advantage on the margins everywhere else, as it is found thriving on sites far too wet/dry/acid/infertile for sugar maple. Its nutrient demands are lower, it grows faster, matures sooner, has higher genetic diversity, and has roots that are adapted to the extremes of both dry upland and swampy (even periodically flooded) sites. Metaphorically speaking, red maple is blue collar, unassuming, and frugal in how it goes about its business while sugar maple is more akin to a demanding prima donna.
Another unique characteristic of red maple is its seed ‘phenology,’ or timing: it is our only upland hardwood that matures and drops its seed in the spring and early summer, which germinates immediately thereafter, a strategy usually only employed by riparian species. As most tree seeds drop later in the season and remain dormant until the following spring, this gives red maple seeds and seedlings a head start.
As far as what has happened around red maple that has led to its population explosion, the following have all played a role:
- fire suppression—this is likely the biggest factor, as the bark of red maple has nearly no fire resistance, so the trees would have been killed off regularly and repeatedly by wildfires, which were a common natural occurrence as well as a deliberate management technique utilized by native peoples of the region prior to colonization; oaks would have thrived in this circumstance;
- widespread disturbance in general—we’ve caused a crazy amount of forest disturbance in the past 250 years; left to themselves, more tolerant sugar maple and beech (and hemlock) will eventually succeed red maple in undisturbed forest stands;
- high grading of more desirable trees—this is more of a personal observation, but it seems to me that in my woodlot, and in the hills around it, that there are lots of BIG red maple around that were passed by during earlier timber harvests—both due to the low financial value of these trees at the time, and lower Btu value for its firewood compared to other readily available species; these ignored trees thereafter functioned as the dominant seed trees for the next generation of forest;
- man-made exponential increase in the deer population—deer like to eat red maple seedlings, but not the seeds, and not near as much as they like to eat acorns, which has given red maple a distinct advantage on drier upland sites that would once have been oak-dominant; red maple is also a far more reliable and prolific seeder than are oaks;
- importation of gypsy moth caterpillar—due to human ignorance; the gypsy moth caterpillar will eat red maple foliage, but it is a less preferred food than are oak leaves, again favoring red maple on upland sites;
In sum, short of some new insect or disease (you never know these days), it seems that the ecological stage has been set for red maple to remain a dominant species in many of our woodlands for some time to come.
So if you’re like me, and have lots of red maple around, don’t despair. While it may not be the best (or even all that good) in any one given category, it ranks pretty high in most all of them, which seems to be the secret to its success. It’s an ok firewood, and currently has an ok value on the timber market, true to its generally ok nature. It’s reproducing like mad though, and will grow nearly anywhere, so next time you’re out wandering around your woodlot, take some time to get to know your red maples, as like it or not, they seem to be sticking around for the long haul, bearing many offspring, and humbly going about their business like the unpretentious, working class trees they are.
Resources
- New York Forests 2012, U.S. Forest Service Resource Bulletin NRS-98, 2015.
- “The Red Maple Paradox,” Marc D. Abrams, Bioscience, May 1998, pp. 355-364.
- New York Stumpage Price Report, Summer 2016/#89: http://www.dec.ny.gov/docs/lands_forests_pdf/spr2016s.pdf.
- Silvics of Forest Trees of the United States, U.S. Forest Service Agricultural Handbook No.271, 1965.

This red maple slab (above) came from a large specimen in my woodlot that was showing signs of crown dieback. I felled the tree and, since I own neither a tractor or a sawmill, milled it right where it fell with a chainsaw mill (satisfying but LOTS of slow work), and air-dried it for close to a year before beginning to work with it. The slabs dried very nicely, without much warping or checking. As the image depicts, they also handplaned quite nicely, with minimal tearout and great luster on the planed surfaces:

While the industry considers it a ‘defect,’ I really like the darker color of the heartwood in maple (which in this case is really wide, likely reflecting a combination of genetics and growing conditions). In most circumstances, trees like this would be cut into narrow boards of uniform blonde sapwood in order to maximize their dollar value on the market, while the wide multi-hued band of heart would most likely be cut into pallet wood, or chipped for pulp. Bummer.
Here’s a few more pictures of red maple that I’ve put to use, again all sourced from my woodlot, the last photo being a table that ended up destroyed by UPS on its way to a client in Maine a few years back (on Christmas eve, no less), but that is a story for another day………
the adze
I have long been in the habit of buying tools before I really ‘need’ them. Sometimes it has been because I found a really good deal on a unique or high quality tool; more often though it has been because I have felt the urge to expand my skill set into some new and different realms. On occasion this has almost been a subconscious process, as my desire for certain tools has seemed to arrive ahead of any distinct awareness on my part of the urge to start working in different ways. The upshot of this is that certain purchases have remained untouched—sometimes for years—before I get around to being ‘ready’ for them. It was in this spirit that I bought an adze a long while back, before I had any idea of what I would eventually end up doing with it. I had sharpened it, and used it to debark a few logs before running them through a portable sawmill, but mostly it had just hung on the wall and looked cool (in my mind anyway).
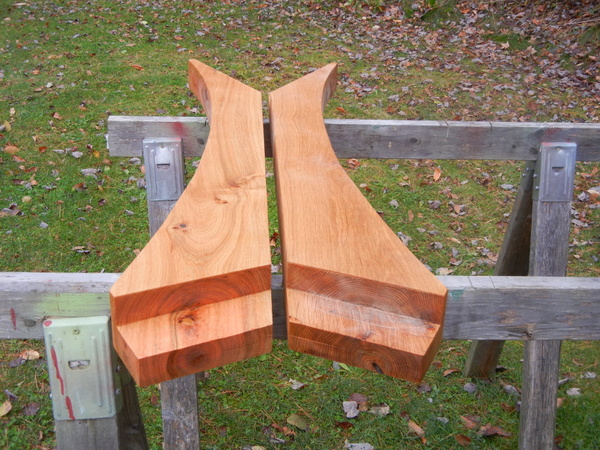
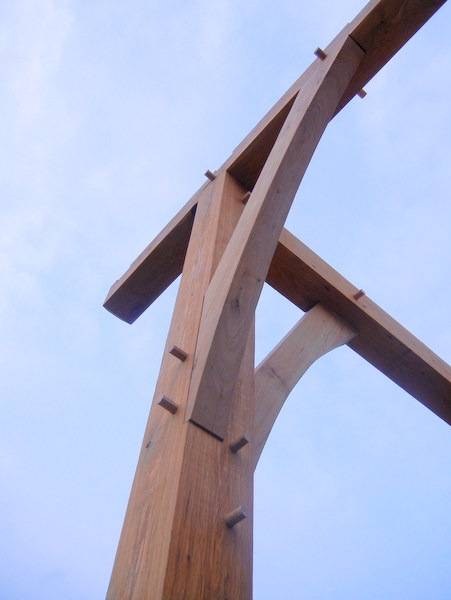
 I finally got my chance last fall, when I started building a timber-framed front porch onto our house, and realized that I wasn’t sure how to go about shaping the large (3″x8″x6′) curved knee braces that I had designed as part of its structure. When working with curves in furnituremaking, I generally cut them freehand on the bandsaw before finishing them with convex-bottomed planes and/or spokeshaves, but working with timbers this large would necessitate a different approach, as my shop bandsaw isn’t near big enough for the job. I had briefly considered making a plywood template and using a router from each opposing face of each timber to cut out the shapes, which is another way a woodworker might approach cutting curves in a furnituremaking setting, but then remembered the adze—the dusty, lonely adze—hanging on the wall of the barn, and decided to give myself a crash course instead.
After the axe, the adze is likely one of the first wood-shaping tools developed once humans started working with metals, as opposed to stone, in toolmaking. With only slight variation, it seems to have developed independently in cultures all around the world, speaking to the fundamental ‘rightness’ of its design and functionality. In its most basic form, an adze is just 3 parts: the cutting head, an ergonomically curved handle, and a wood or steel wedge (or maybe sinew in a ‘primitive’ version) to hold the two together. Generally speaking, there are two different types of azde: the foot adze (such as the one seen here), with a long handle designed to be held by both hands while working a piece of wood down at ground level (between or under your feet), and the hand adze, which is much smaller, with a shorter handle designed to be held in one hand, for smaller, finer, more detailed work. Despite its simplicity, an adze is an amazingly versatile and refined tool, as well as a highly efficient one, as I was soon to discover.
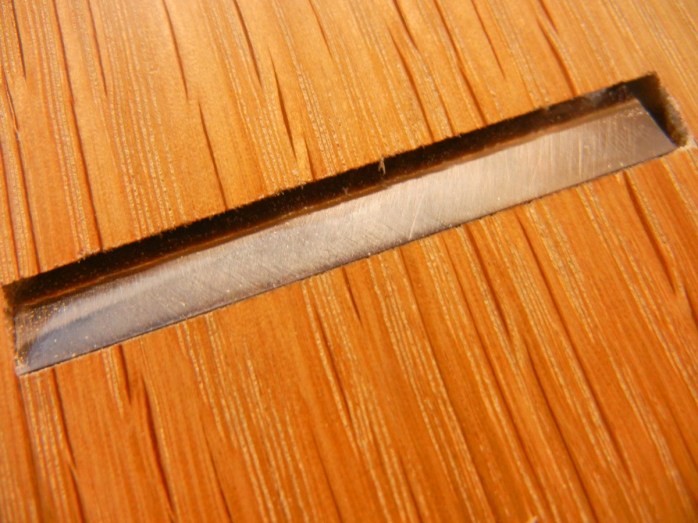
Since I needed to make four identical braces, I did end up making a full-scale plywood template, which in addition to establishing the sweep of the curves to be cut, would also help me in laying out the tenons at the ends of each brace. Once that was done, and the profile was penciled onto both faces of each 3×8 oak timber, I used a skilsaw to cut out as much of the waste as possible in advance, though the entire process could have been done with just the adze, and maybe a little more time. Here’s a brace just before I started with the adze (note the layout lines in pencil):
From there, I took a deep breath, straddled the workpiece, and started chopping (adze-ing?) away, working in from each end in order to cut with the grain. With a heavy timber such as this white oak, it’s weight alone (along with the friction between it and the grassy ground) was enough to keep it stable and in position as I began to swing the tool. I quickly realized that I would need to experiment with my hand and body positioning, as establishing the correct angle of attack for the curved blade to make contact with each swing is infinitely variable, depending on whether your aim is to quickly remove lots of wood, or to finely finesse your way right down to the finished surface. Excessively shallow cuts will glance off without slicing into the wood (watch your shins!), while cutting too steeply will stop the blade entirely without removing any material. It is this very range of angles that makes for the tool’s versatility though, and in a matter of minutes I was already feeling daring enough to cut to within maybe 1/8″ of my layout lines:

Taking the first brace down to this point took me maybe 20 minutes. The next three went faster still. It was so much fun I was sorry to be done. Making chips like this is way better than making lots of airborne sawdust (like my other proposed methods would have). Excepting my chops, it was also quiet. I could periodically stop and rest and just enjoy the silence. I imagined what a woodpecker feels like working away on a tree in an otherwise still forest setting. The best part, though, was that using the adze connected me with the wood in a very unique way, as the ‘feedback’ received from each stroke guided the next one. Whereas the very nature of a ‘power’ tool—the use of linear brute force to do something to something else—generally alienates the worker from the material being worked upon, the adze is an example of a tool that by contrast requires a full and nuanced awareness and moment to moment connection between the worker, the tool, and the wood. It’s like a dance, rather than running a machine. That’s what makes it so much fun, and it’s also what makes it so effective. The luddite in me loves that.
Here’s a pair of finished braces (with a coat of linseed oil):
And here’s the finished product:

the right tool
 Often times, the only way to know where the middle lies is to get some experience at either end first. Generally, exploring the extreme poles is a youthful endeavor, as with age (so we hope) comes the humility to realize that the black and white ideas/ideals that we harbor in our heads have little bearing on ‘reality,’ which will forever stubbornly (or more accurately perhaps, indifferently) refuse to fit into whatever tidy box we devise for it. In the meantime, swinging wildly from pole to pole provides the lessons necessary (presuming one is willing to learn) for developing a mature perspective, usually in the form of failures and humiliations of one sort or another.
A particularly amusing/annoying characteristic of this process is that when at one extreme or the other—and it doesn’t matter which really—the person in question often decides that he or she knows everything about the subject at hand before really knowing anything about it. To illustrate, I’ll share just one example (of many, I’m afraid) from my own idealistic youth. In this case, a woodworking example.
My first experiences of working with wood as a teenager were in housebuilding, pretty much exclusively with power tools. While the journeyman carpenters I worked with owned—and seemed to occasionally even make use of—certain hand tools (such as planes, saws, and chisels), they never really discussed them, and certainly offered me no insight as to how to use and/or maintain them. Being a rebellious youth, full of authority issues that I would readily project onto most any adult in my vicinity at the drop of a hat, I soon decided that since these guys didn’t have much use for hand tools, that they must not be using them solely due to their own ignorance (rather than due to the fact that they were building houses, not cabinets, for instance). So, obviously enough, using hand tools must in fact be the REAL way to work with wood. What did these Yankee impostors know anyway?
I was able to double the dogmatism when I moved from New England to California and discovered Japanese woodworking tools, which I immediately decided were inherently superior to traditional European hand tools in all respects (I of course being of European heritage). I proceeded to buy all kinds of very expensive tools, with laminated, hand-forged steel cutting edges that I still did not know how to set up and sharpen properly. I ended up attending some workshops on the use of Japanese woodworking tools (which was, ironically enough, taught by a similarly dogmatic-minded Caucasian transplant from the East coast), and came away mainly with further certainties about the superiority of Japanese tools, as well as with the idea that there was only one right (and very difficult) way to sharpen all of them.

So rather than working much with wood (I was still working with power tools as a carpenter by day), I went through a phase of spending endless hours trying to figure out how to adequately sharpen any of my fancy tools so that they might display their inherently superior qualities while actually in use. When I eventually began to build small furniture pieces, they were, short of the initial milling of the lumber, constructed entirely by hand. I was quite proud of them, and of course of myself, for having reached this pinnacle of woodworking prowess. Or so I thought.
Time went by, and, as often happens, utility began to win out over idealism, as I now had my own business and thus had to stop worshipping my ideas about what woodworking was in favor of working in the most efficient ways possible. What this meant in my case was that I began to relinquish my ideas about tools, and began to actually just use them, and what this really meant is that I began for the first time to learn from them. Amazing what can happen when you simply pay attention to what’s in front of you, rather than to the endless stream of thoughts about what’s actually there.
 What the tools taught me over time was that they were as individual as people, with unique strengths, limitations, and nuances. At this point I began to reacquaint myself with Western/ European hand tools, and even began a brief reactionary slide toward deciding that they were in fact the superior tools, before finding the middle ground where I can now choose the right tool for the job without arbitrary discrimination.
There are woodworkers out there who purport to do everything by hand. If they can make a living, and are enjoying themselves, good for them. At the other extreme are the many woodworkers who do literally everything with power tools, who are immediately at a loss without them, even in performing the simplest of tasks. In trying to break through the ‘purist’ handtool dogma that still reigns in some woodworking circles, a renowned woodworker once said that if his teeth were the best tool for the job, he would use his teeth. That’s about where I’m at these days. The tools themselves tell me which one to use.
Pearl the lumberjill

Last weekend, we bicycled a mile up the road to visit with our neighbor Pearl Bush, to help celebrate her 88th birthday. Pearl (along with her now deceased husband, Howard) moved to our narrow valley in 1946, bought 160 forested acres, built a small home and barn, and began a largely self-sufficient homesteading life, growing much of their own food, raising a variety of livestock, and, for the next 15 years or so, generating income by running a small logging business. The “toolkit” for their logging operation consisted of little more than a crosscut saw (that is the saw she’s holding in the picture above), a few axes, rope, a horse or two, and a flatbed truck to haul the lumber to market.
It is hard to imagine today, but the portable one-man (or woman) chainsaw did not even exist until the late 1940’s, and would not become commonplace for another decade or more. A well tuned and razor sharp crosscut saw and/or axe—powered by strong and skilled human beings—felled pretty much ALL the timber ever harvested prior to the end of World War II (and all along I’ve thought that I was working hard in my woodlot with my chainsaws).
Here’s a shot of the two of us (for a sense of scale I’m about 5’9″):
 Sixty-seven years later, Pearl is still here in Prospect Valley, living in the same house she and her husband built. She’s still full of life and energy, has a great (and occasionally vulgar) sense of humor, and tells unbelievable stories about her long and eventful life that serve as a reminder of how utterly different our world was a few brief generations ago, and of the dignity to be found in a life of honest physical labor in close connection to the earth.
Happy Birthday Pearl. May you have many more.
New York Forest Owners Association
A brief profile of me, my wife Suzanne, and the ongoing work of managing our woodlot was published in the latest edition of The New York Forest Owner, the bi-monthly magazine of the New York Forest Owners Association. NYFOA is now in its 50th year, and continues to work in support of its mission: “To promote sustainable forestry practices and improved stewardship on privately owned woodlands in New York State.”
If you own woodland in New York (or beyond), and would like to become a better steward of that land and its forest community, NYFOA is a great resource. Consider becoming a member, and make our collective voice in support of sustainable, holistic forest management that much stronger—-go to the NYFOA website for more information about how to get involved.
bats
Ten years ago, I started planting and tending a backyard orchard of about 50 fruit trees. From the outset I have been attempting to manage it organically, which in the northeastern U.S. is no small challenge, as there are a great many other life forms (mammal/bird/insect/microbe) which also would love nothing more than to devour the sweet fruits, if not the entire trees. While there are any number of systemic—and highly toxic—sprays readily available that I could be using to kill ALL (and I mean all) of the insects and disease in the orchard, poisoning the fruit prior to eating it has just never felt like a particularly smart choice (I know, call me crazy). While genocide in the orchard definitely makes it more feasible to grow a high percentage of the “perfect” shiny orbs that pass for fruits in the supermarket, such sprays also kill off most if not all of the insects, bacteria, fungi, and pollinators that colonize and/or utilize the trees in a benign or even beneficial way—the ones that are your dear friends should you try to work with nature rather than fight an endless uphill battle against it.
In any event, as I have struggled to learn about the various threats to my trees and how best to protect and nurture their delicate crops of fruit, I have made all kinds of mistakes, and have lost a number of trees over the years—to voles, deer, insects, disease, and winter cold (and if I’m going to be entirely truthful here, to a large Ash tree nearby, which I managed to fell right into my young orchard as opposed to away from it, but that’s a story best saved for another day…….).
My learning curve has flattened, but there is still a great deal that I have yet to understand about the complex ecological relationship between a fruit tree and its environment; despite this, I have managed to harvest incredible crops of heirloom fruit while using a super low-spray approach.
As my time for managing the orchard is limited, and as I have decided to forgo the “conventional” pesticide approach, I am always on the lookout for synergistic ways to encourage diversity in and around the orchard, with the goal of providing the conditions that will enhance the habitat for species that will help me out while doing their own thing—kind of like anarchist “mutual aid” in the orchard (which sounds cool at least). Insect-eating birds, pollinators of all types, companion plants that discourage pests/encourage beneficial insects/contribute to soil fertility, bacteria in compost making vital nutrients readily available in the soil, and mycorrhizal fungi in the root zone are all more than welcome in my orchard, and I do everything I can to make it a highly hospitable environment for them (the work of Michael Phillips has been invaluable in this regard; The Apple Grower and more recently The Holistic Orchard are two of the very best references should you be heading down a similar path). With another growing season on the way—with spring having just arrived—I have been making plans to expand my communal endeavor out back, and just this past week set the stage for inviting another comrade to the orchard, your friend and mine, the bat.
Bats are our only truly flying mammals (evidently “flying” squirrels are really gliding, not flying), and are tremendously successful insectivores, capable of eating up to 50% of their body weight in insects per night, which can amount to 600 or more insects per hour. It has been estimated that a colony of 100 little brown bats can devour 250 thousand mosquitoes in a single night, which is hard to even imagine (it’s also hard to imagine being anywhere in the vicinity of 250 thousand mosquitoes). This hunting takes place between dusk and dawn, so while bats have functional eyes—so are not “blind as a bat”, as the saying goes— they utilize echolocation to “see” their prey, even in complete darkness.
Interestingly, a bat “wing” is really a hand, with four long fingers connected by a thin flight membrane that connects back to their torso, and a little thumb tipped with a tiny claw (hence their classification in the Chiroptera order, which means “hand-wing”). As we’ve likely all seen after sunset, bats catch their prey in mid-flight, flapping rather awkwardly (averaging 15 wingbeats/second, at speeds upward of 20 mph) and catching insects directly in their jaws, or funneling them from their wing or tail membranes toward their mouths, which are full of tiny, but quite formidable looking, teeth. Speaking of those teeth, despite myths to the contrary, all American bats are insectivorous, so have no interest in sucking your blood, or getting tangled in your hair, and while they can carry and transmit the rabies virus, it is present in only about one in every 200 bats tested.
There are 45 species of bats in the U.S., and 9 in New York, which can be divided into two basic categories: cave bats, which hibernate to overwinter, and tree bats, which are migratory. This is a crucial distinction, as the six cave bat species, as you have likely heard by now, have been decimated by a fungal disease known as white nose syndrome. It has been estimated that 88% of all hibernating bats in our region have died since white nose syndrome was first discovered in a cave near Albany in 2006. It has been especially devastating to the Little Brown Bat (Myotis lucifugus), which was previously our most common and numerous species here in New York. Unfortunately, the Little Brown overwinters in large, tightly packed colonies in the relatively few caves suitable for hibernation in the state, leaving it nearly no chance to avoid exposure to the fungus. The Big Brown Bat (Eptesicus fuscus) is likely now our most common species, as it has been less affected due to a tendency to overwinter singly or in small groups, often in buildings instead of caves.
As soon as I heard about white nose syndrome, I knew that I wanted to try and support the bats that spend the warmer months in my area. I usually see at least a few circling my yard each evening at dusk during summer. I never managed to make it a priority until just recently, though, when I discovered what amazing insect control they can provide. I mentioned the mosquitoes already, which evidently can be a significant part of the Little Brown’s diet, but bats also eat roaches, termites, ants, gnats, flies, June bugs, garden pests such as cucumber beetles and rootworms, and major orchard pests including the codling moth, oriental fruit moth, various budmoths, leafrollers, and leafhoppers. I would gladly provide free “housing” in exchange for this kind of nightly patrol.
There is a great deal of information about bats online, including how to go about encouraging them to move to your area. Bat houses can be purchased (they are relatively inexpensive) or built, using one of any number of free plans available (I used a simple design for a single-chambered house from Northern Woodlands magazine). With one sheet of 1/2″ exterior grade plywood and a few pine 1×2 strips that were laying around my shop, I was able to build six houses for under $30!
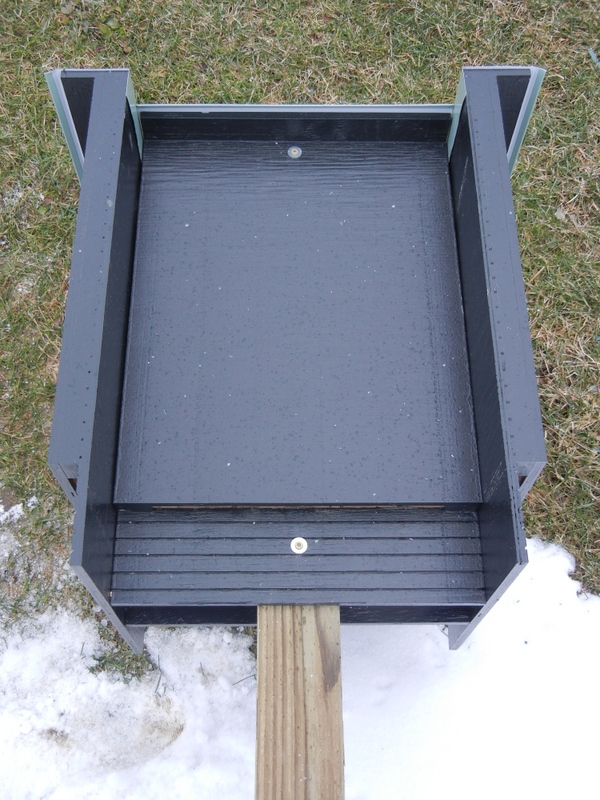
This is a backboard for a house, with shallow kerfs to make it easy for the bats to cling to while they roost or sleep (which they do upside-down):
Here’s a completed house (use exterior-grade glue!); note that the backboard hangs lower than the front edge to provide a “landing strip”:
Here’s a closeup of the opening, which should be no more than 3/4-1″ wide—bats like tight quarters, and it helps to discourage bees or wasps from nesting, which can drive the bats away:
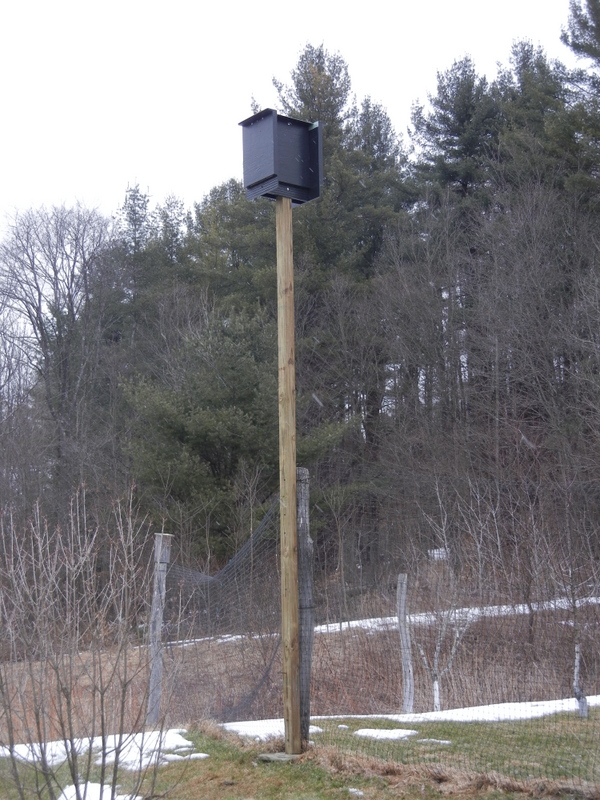
Last step is to paint them a dark color (black here) to absorb heat if you live in the northern part of the country, as bats prefer warm accommodations; I also added “roofing” with some metal flashing I had left from my barn roof, which will shed rain and help preserve the house:
As I wanted to encourage the bats to spend time in and around my orchard, I mounted 4 of the houses on a long pole (15-20+ feet high is recommended) which I attached to one of my orchard fence posts; it’s like a bat “ecovillage”:
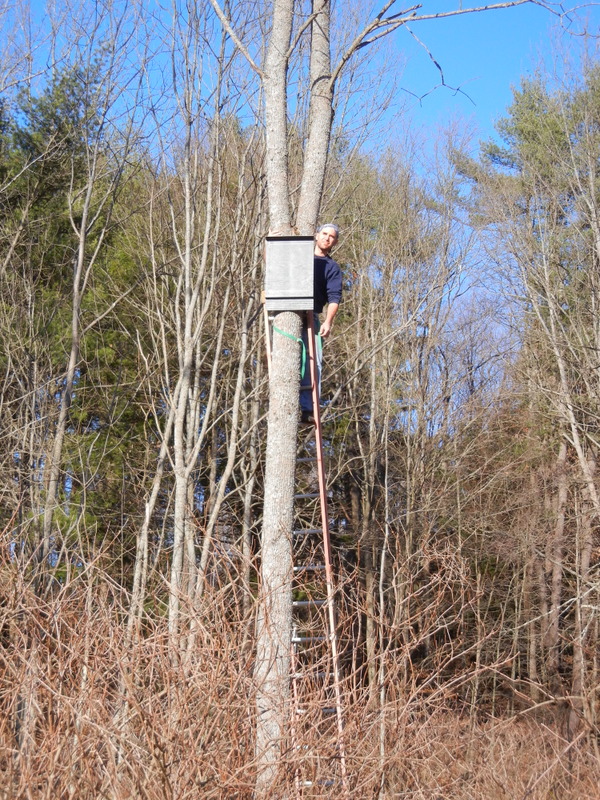
The other two houses I mounted on south facing trees at the forest edge, so as to maximize the amount of sunlight hitting (and warming) the boxes:
Bats in my region generally end their hibernation in March, and begin to arrive at their summer roosting/breeding spots in April, so hopefully over the next few weeks I’ll see some fuzzy little brown (or big brown) heads poking out of their new homes, which I am more than happy to provide, rent free. Meals are also included—all you can eat. I’m hoping that this is an offer simply too good to refuse.
mistakes
It’s a little hard to see what’s going on in this picture. Well, what you’re seeing is a mistake. A repaired mistake. My repaired mistake. Sigh.
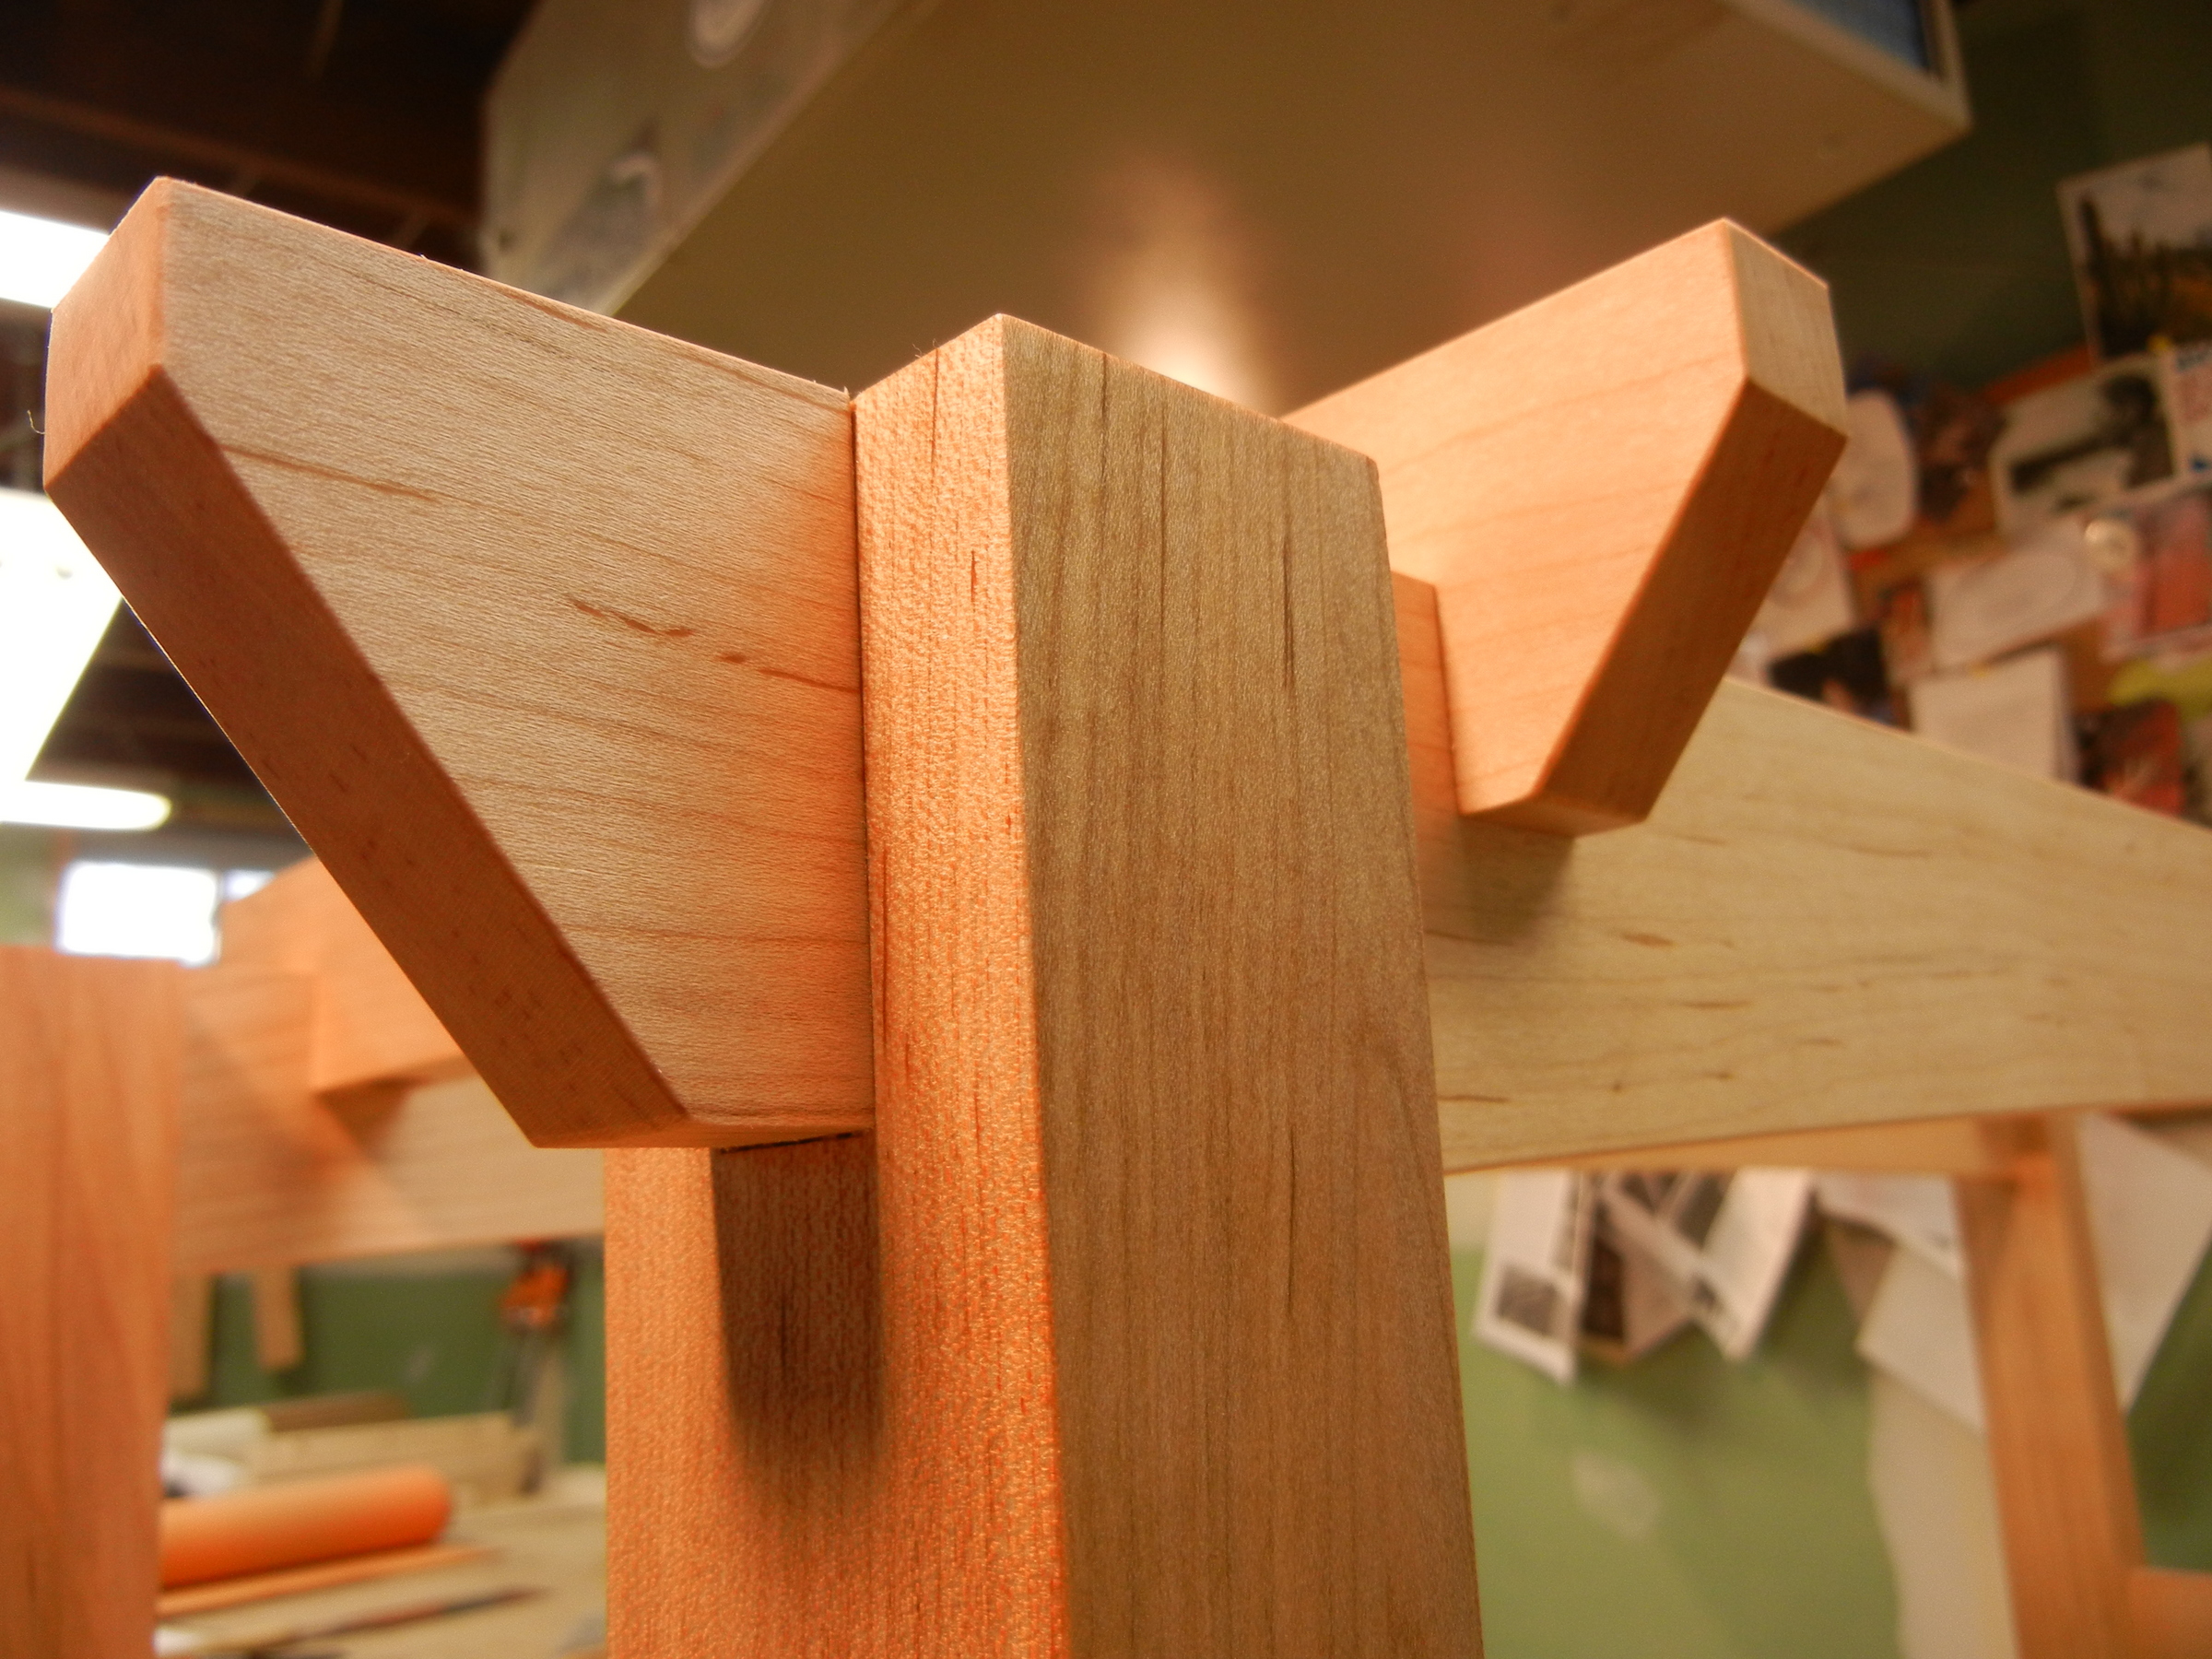
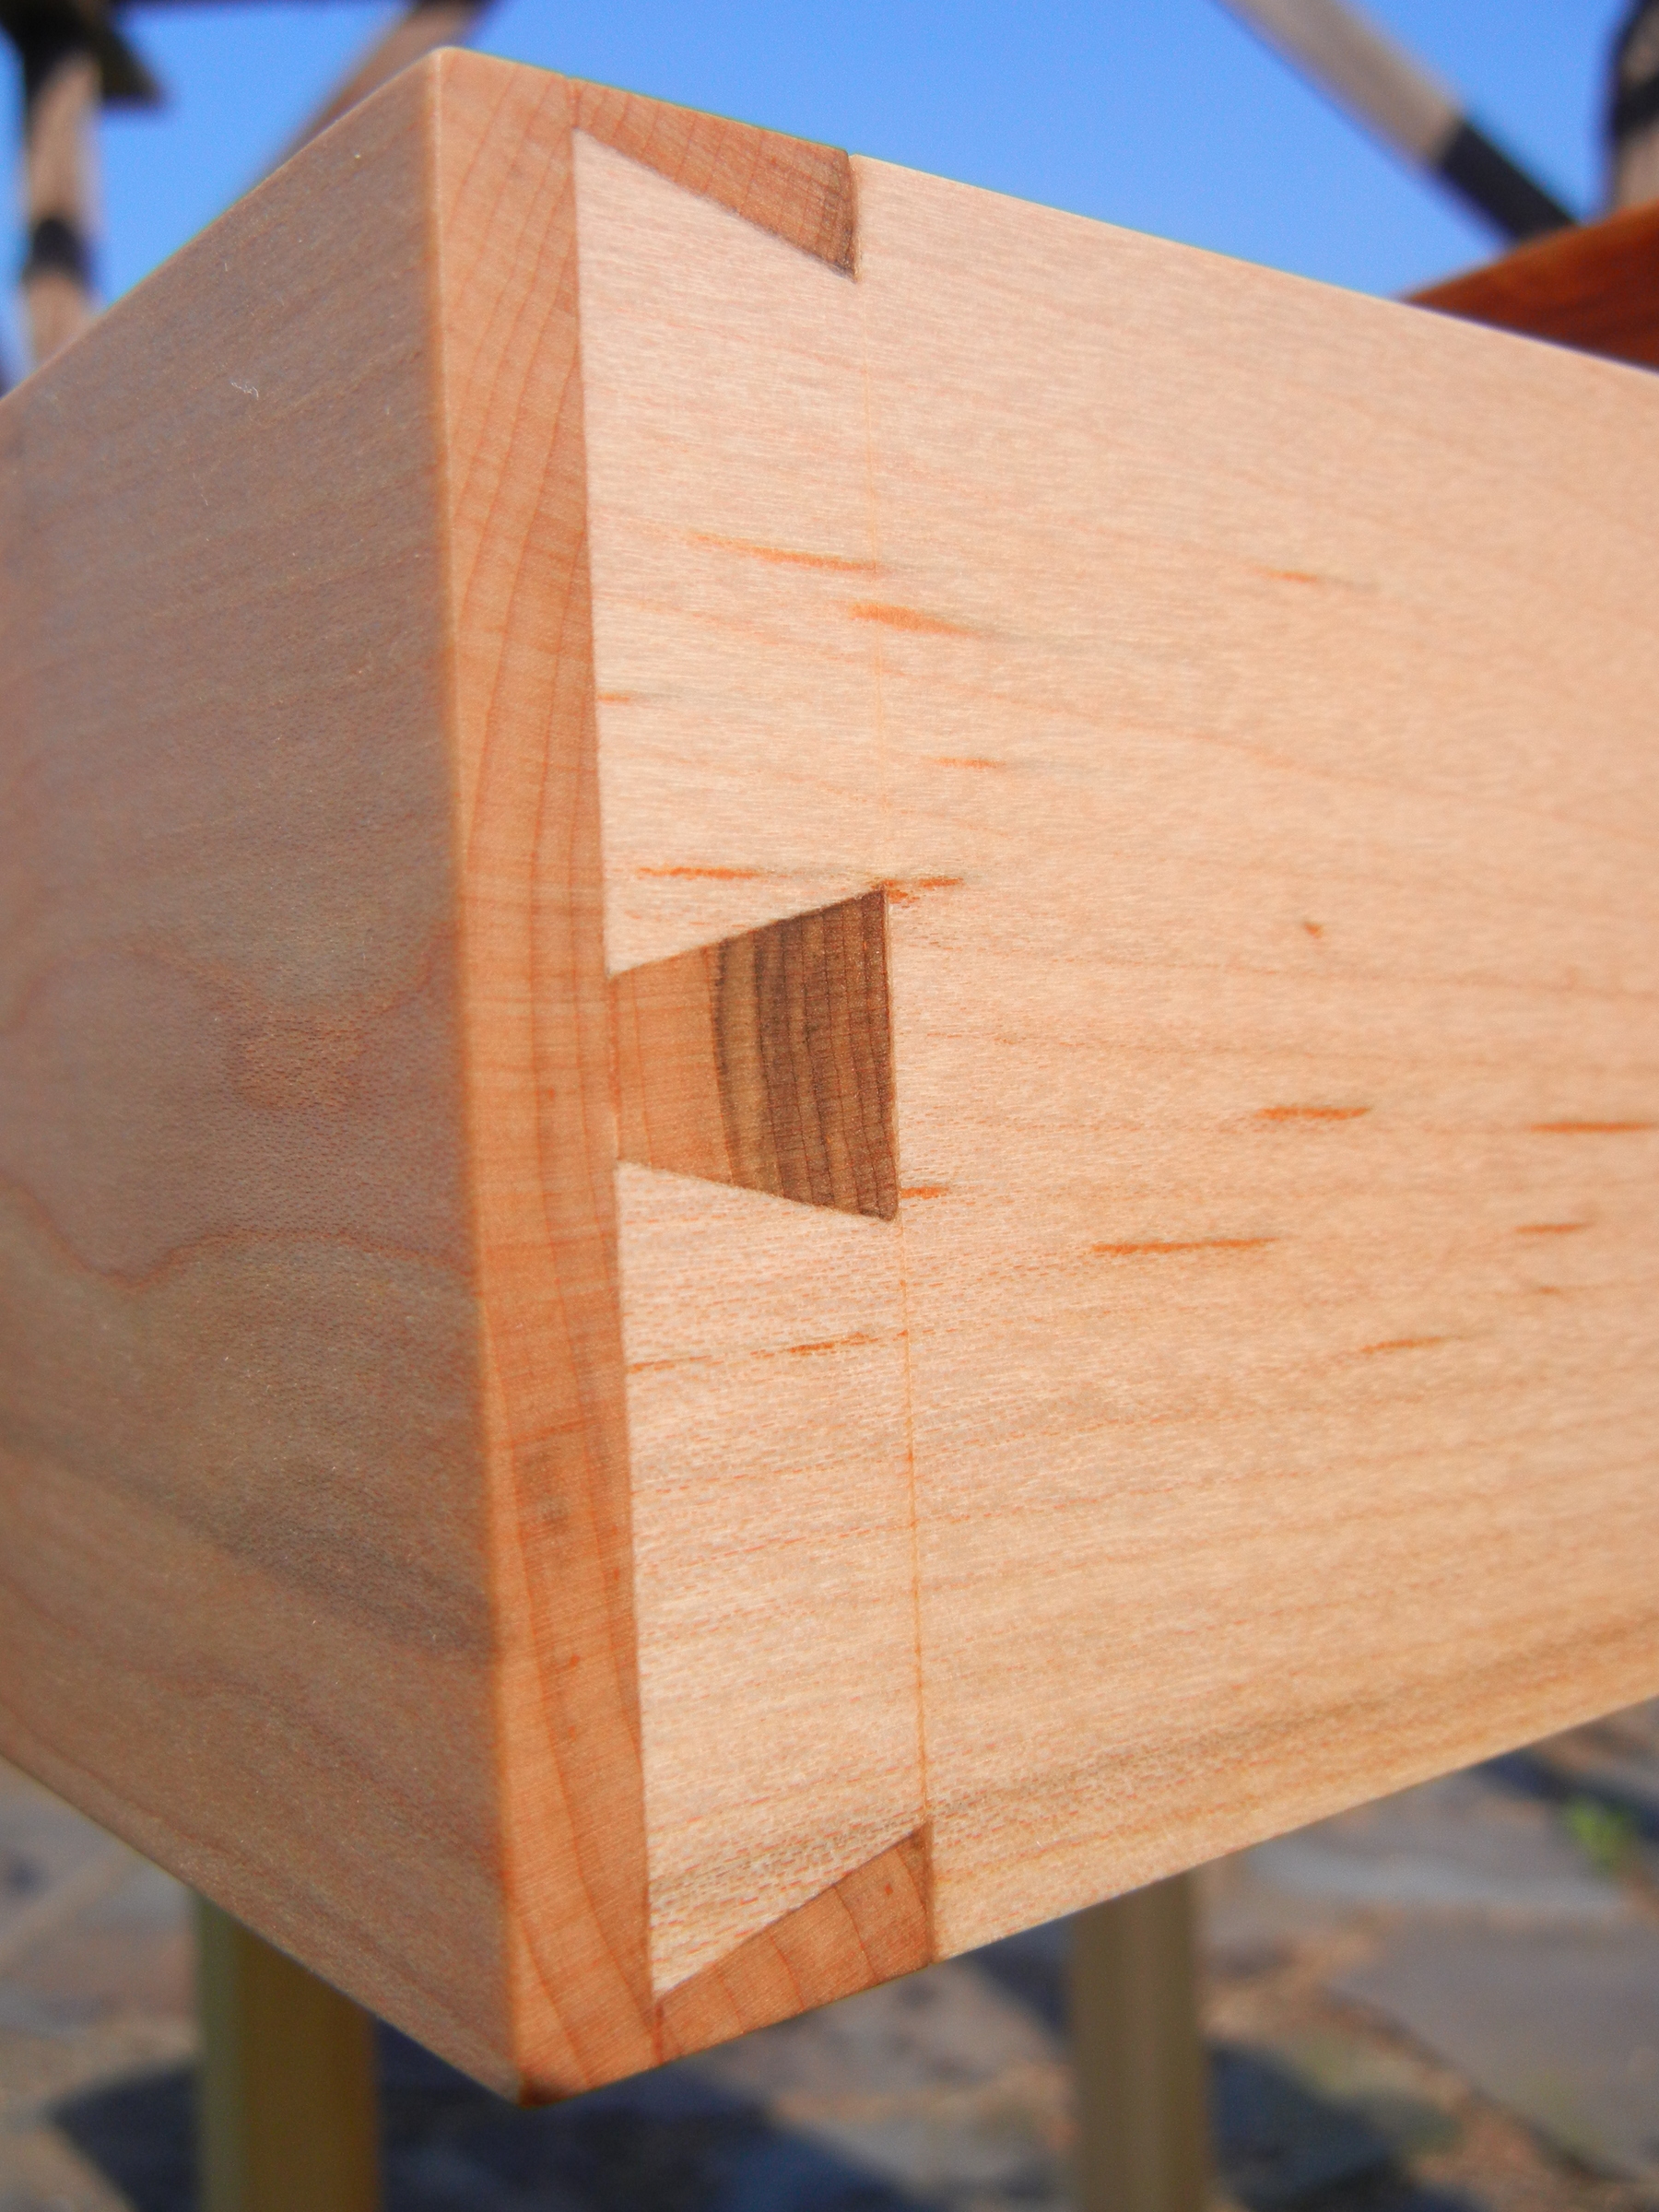
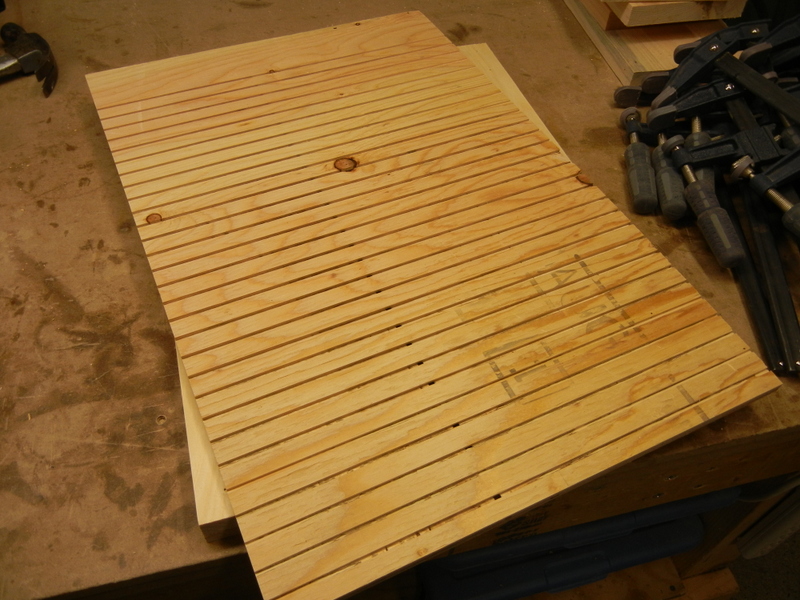
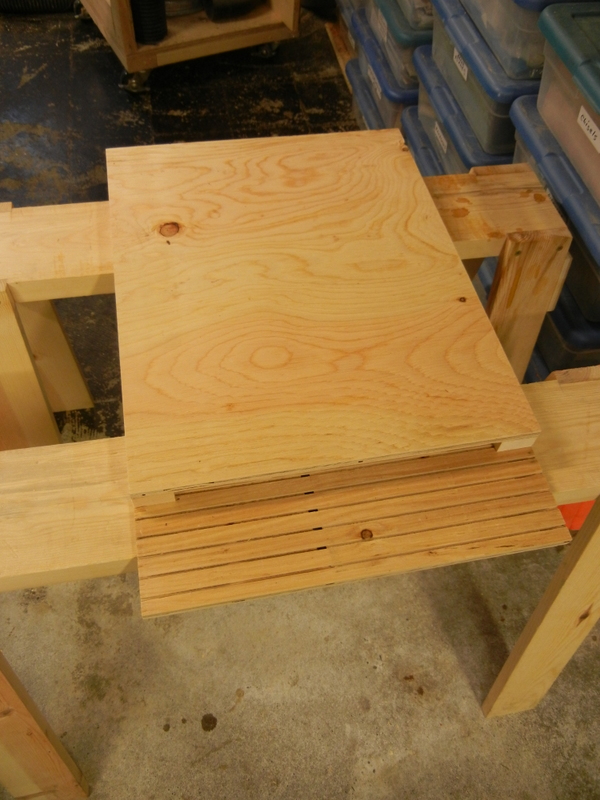
The piece is a 2″ thick cherry top brace for a trestle table I have been building for my dining room (and will be writing about in some detail shortly). The part in question is one of the two in the center of this photo:

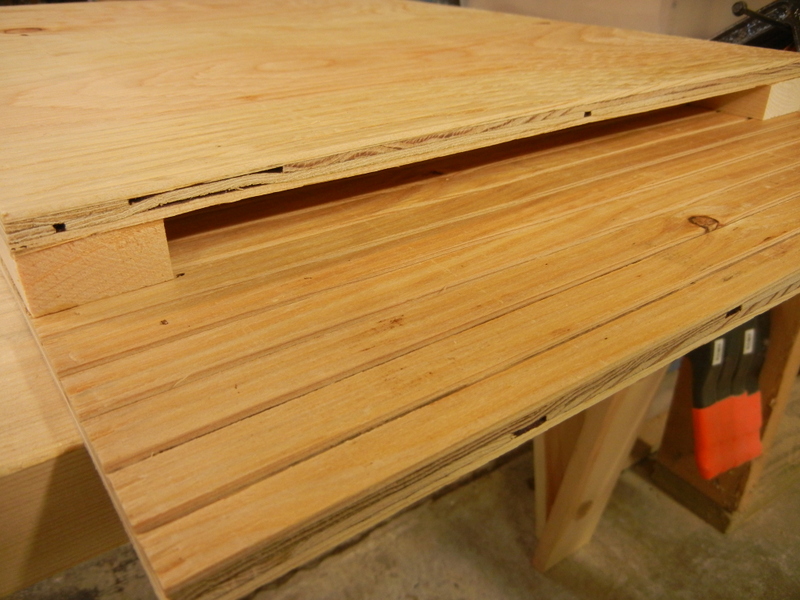
As I was routing the slot that you can see in the image (which is the means of attaching the tabletop to the base, with one of the “buttons” seen in the lower left of the photo), my router slipped and ran out the edge, leaving an ugly 1/4″ wide scar and some tearout at the edge. If it was a more visible component, it would have ended up in the kindling pile (the expensive kindling pile). In this instance, the brace is under the table, and the damage was on the top edge of the brace, right up against the underside of the table top, so will likely be seen by no one, ever. But me. I’ll know it’s there. I’ll lay awake at night and agonize about it being there.
I once read that the mark of a craftsman is the ability to repair his or her mistakes. Fair enough, but it’s not the whole story. The mark of a craftsman is the ability to live with his or her mistakes, which is easier said than done.
All told, I think it’s a pretty good repair though. I especially like the penciled in gum streaks. Can’t even see it in the second image above. With the finish on, even I am pretty hard pressed to find it now.
But I still know it’s there.

