jeff joseph -- woodworker
handcrafted furniture from sustainably managed woodlands
pine box
When asked to sum up the nature of existence in a few words, a Buddhist master once replied “Everything changes.” Of the few things that we can be absolutely certain of in this life, one is that—at least based upon all empirical evidence I’ve ever seen—we will all die one day. It is interesting to stop and take note of, on the one hand, what a prominent role death plays in our daily experience (consider eating, for example, or maybe action films), and on the other how little attention we give in advance to such a fundamental truth as it applies to us.
Along these lines, I’ve long had the idea that I would build a coffin someday, whether for myself, or for someone in my family or community. I’ve always thought of it a rite of passage of sorts for a woodworker, yet in all the years I’ve been woodworking, I have never prioritized it myself, nor have I ever personally known anyone who had built one.
As in so many other realms of our society today, mass production and global commerce have largely taken over a role that used to fall to local, individual craftspeople. This is unfortunate, as what is lost in the process is connection: to place, to the local resource base, to the local economy, and most importantly, to the other people that make up the communities where we live. As I’m always more than ready to fight against that tide, I recently decided to design and build my first coffin.
Beyond those concerns, though, a more practical part of my recent motivation was to be well prepared for the moment should I be called on to build one. Designing and building anything on the fly is challenging; for something of such a personal and emotionally charged nature, and that is often on a strict (and potentially abrupt) timetable, I wanted to ensure that to the extent possible I would be able to work in a mindful way, putting intention into each step of the process, rather than working with a chaotic or stressful mindset. In this regard, preparing and testing a design in advance would be critical. I also would need to have an accurate sense of the materials required, where I could reliably source them, and what they would cost.
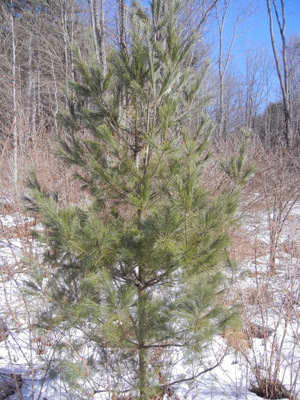
Once I decided to get started, the first thing I needed were some design parameters. An overall guiding principle would be ecological: all the materials would be 100% non-toxic and biodegradable. Right off I knew that I wanted to work with Eastern white pine (Pinus strobus), which would have been a traditional choice locally, and is lightweight, reasonably priced, and readily available.
I put in a call to a local mill and ordered a quantity of #2 common pine boards, at a thickness of one inch, and in widths varying from 6-8″. These dimensions would allow me to resurface the boards as necessary, while still leaving ample material for strength and stability. My goal was to end up with 7/8″ thick by 5 1/2″ wide (or wider) boards, with some narrow rip cuts left over to serve as cleats and braces. Waiting for the freshly cut lumber to come out of the drying kiln would give me time to come up with a plan.
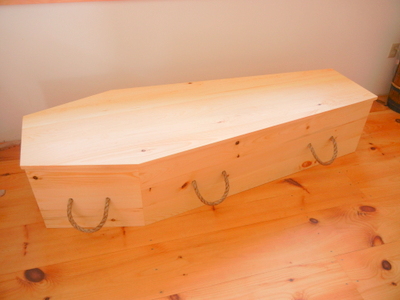
The first step I took in developing a design was to look for some “standard” dimensions online. What I found was all over the map—most of the search results related to Halloween props, rather than functional coffins, or caskets. I always thought the two were synonymous, but discovered that a coffin is a six-sided box, while a casket is in the more common four-sided rectangular shape. Having weighed the options, I decided to build a six-sided version, which is also evidently known as an “old world” coffin, or more amusingly, a “toe-pincher,” due to its taper towards the feet. This style would require gluing up a number of solid panels, as opposed to a casket, which could more easily be built in a frame and panel style. Maybe it’s because I watched a lot of westerns (or Dracula films) when I was young, but I had always envisioned building a toe-pincher as my first coffin; working out the angles would provide more of an interesting challenge than would 90 degree corners.
While there are some standard dimensions for a casket in the industry (84″ long x 28″ wide x 23″ tall), those are exterior dimensions, and so were of little help in designing my more austere unlined pine coffin. So I rolled out some kraft paper on the floor, laid down on it, and enlisted my wife to draw my outline and take some measurements: length, width at various points (especially the shoulders), and the height of various parts of my body in a prone position. At 5’9″ and 160 lbs, with size 9 feet, I’m pretty much your “average” American male with respect to height (and maybe shoe size), but about 20 pounds lighter; in any event, this gave a starting point. From there, I started working up a design with Google Sketchup, which was extremely helpful in experimenting with various dimensions and figuring out the angles with different configurations of length and width:
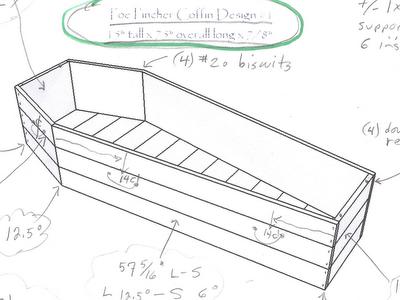

 As opposed to building a one size fits all coffin, I decided to focus on the average height range, and ended up with a 73″ interior length, along with a shoulder width of 26 1/4″, and an interior depth of 13″. Construction was pretty straightforward:
- joint and plane all the boards
- glue up panels for the sides
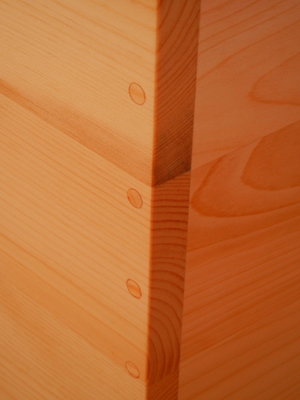
- cut the angles and joinery (row of #20 biscuits at the shoulder joints; plugged screws at the ends)
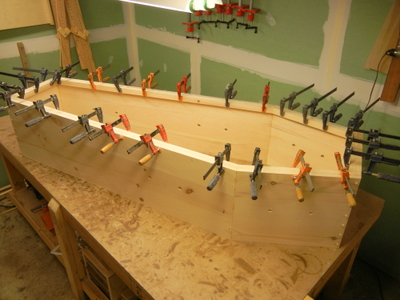
- dryfit then glue up the box (in stages)
- add cleats (glued and screwed) to support the shiplapped bottom boards
- mill and install bottom boards
- glue vertical supports to the inside corners, and add small moulding where floor meets sides
- layout and drill 12 holes for the 6 rope handles
- glue up a panel for the lid, shape it to fit the box with 3/8″ overhang on all sides, add battens to the underside to hold it flat
- drill for dowels that hold the lid in alignment with the box
- sand/plane all parts
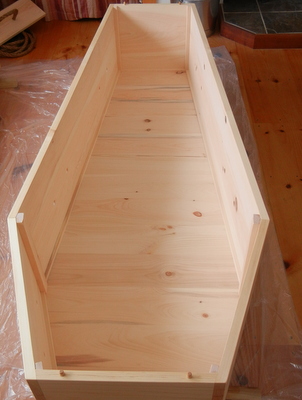
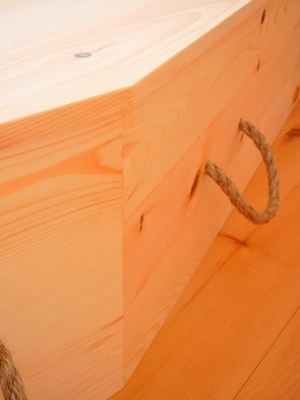
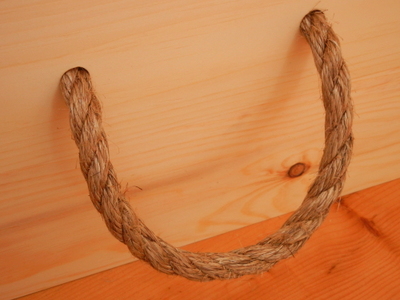
Next came the finish, which was a few coats of linseed oil and beeswax, on the exterior surfaces only, as I wanted the interior to retain the resinous pine scent, and the handles, for which I decided to use natural jute rope (3/4″), as it was economical and more than adequately strong.
All told, it was a successful project, although I would like to build a rectangular casket prototype as well, as it would be much easier to assemble, and would be more amenable to having its dimensions altered as needed, without having to refigure all the corner angles. As for this one, the only remaining step will be to invite a group of friends over to ceremoniously carry it—with me inside— around the yard to test its engineering and ergonomics. After all the work, it will be gratifying (if only for a few minutes) to experience the view from the other side, so to speak. In all seriousness, though, it will be a great honor, and a humbling one, when I am called upon to put these new found skills to use.
tree medicine
Just ran across this article, which describes a statistically significant correlation between the presence (or absence) of trees and human health. In urban areas of the upper midwest most heavily affected by the Emerald Ash Borer—which has in the past 10 years killed over 100 million ash trees—human mortality rates from cardiovascular and respiratory illnesses have risen significantly. In another study, patients in post-operative recovery have been found to heal more quickly, and with less need for pain medications, when there is even a single tree visible through the window of their room. Correlations have also been found between reduced feelings of anger, sadness, depression, and chronic physical pain of all types with regular exposure to forested landscapes. Immune response has been shown to be increased (and stress hormones reduced) simply by walking in a woodland, leading to the practice of forest bathing.
Good article, but it’s unfortunate that the author (or editor) chose to focus on the negative, half-empty cup (“When Trees Die, People Die”); the title should have been “Regular Exposure to Trees found to be Tremendously Beneficial to Human Physical and Mental Health.”
plugs
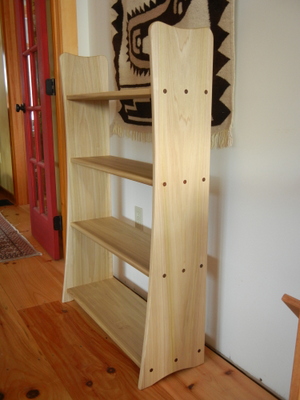
As much as I like building pieces of furniture that rely solely on tight-fitting joints (and small amounts of wood glue) for their strength and durability, there are situations where using some form of mechanical fastener just makes sense. This small bookcase that I recently put together is an example of such a situation.
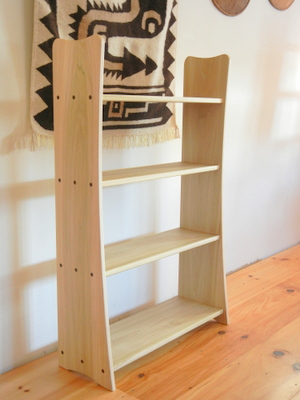
I had a few wide (12″+) Tulip boards left over from a previous project, and was looking to clear some space on my lumber rack in my shop. The boards were 4/4, and in the rough, meaning (for those who don’t know) that they were about an inch thick, and had yet to be surfaced flat and smooth. Unfortunately, the boards were significantly twisted, which necessitated removing a substantial amount of wood in the process of flattening them, so that by the time I was done face-jointing and planing, the pieces chosen for the case sides were down to 11/16″ in thickness.
Normally when I build a case like this, I choose to rout dadoes in the case sides, and cut short ‘tenons’ at either end of the shelves which fit into the dadoes, which, along with some glue, creates a pretty strong joint, despite the fact that end-grain is being glued to face-grain (optimally, a glue joint maximizes the long-grain to long-grain connection of the mating boards, as glue on end-grain has minimal structural strength). Unfortunately, with the reduced thickness of the case sides, I was not able to rout the dadoes deep enough to provide much glue surface in the joint, which would be especially important in a case such as this that has no back to hold it square and provide resistance to racking.
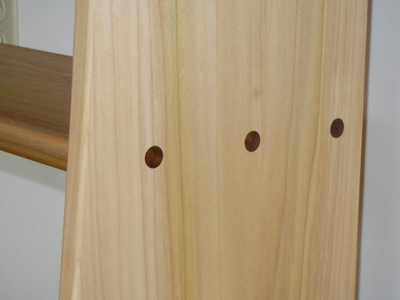
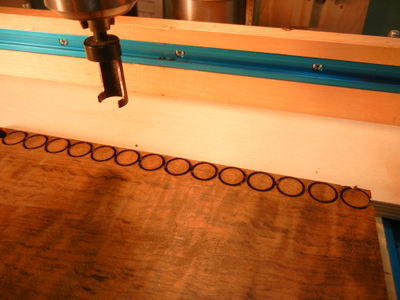
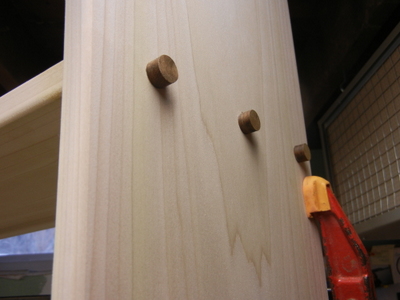
The solution I came up with was to rout dadoes as I normally do, but shallower (1/8″ deep), and to enhance the strength of the joints with screws. This, of course, would require drilling through the outer faces of the case sides, which became a design feature of the piece….once I added some Walnut plugs.
Cutting plugs like this is quite simple, providing you have one of these—
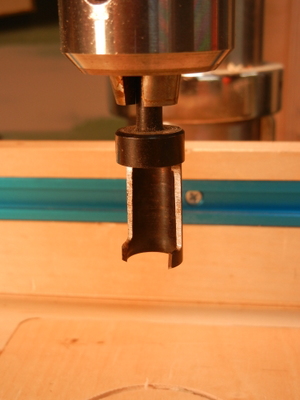
—a tapered plug cutter (note the subtle taper of the cutting edges), which will cut very clean and uniform plugs to fit snugly in a given diameter hole. The cutter shown is for 1/2″ plugs, but they are commonly available in 1/4″ and 3/8″ as well. This is an operation best performed with a drill press, but could probably be done just as well with a portable drill guide and hand-held electric drill. Starting with a squared piece of wood of uniform thickness (and of a species with desirable color and density for the plugs), cut a series of closely spaced ‘holes’ along the edge, to the depth required…
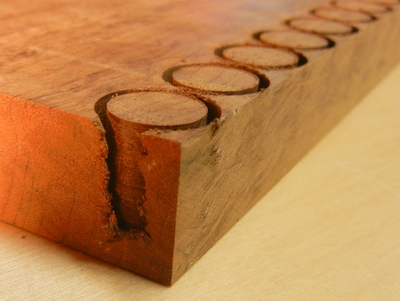
…I usually use 3/4″ thick stock for the plugs, and drill about 9/16″ deep or so. Definitely don’t drill all the way through, as this will cause each plug to stick in the cutter, which will slow things down significantly. Use a stop to maintain consistent depth; this will be important for the next step, which is to cut the plugs out of the board, as they are still attached on their bottom edge.
I usually use a bandsaw to cut the plugs out, but it could also be done with a handsaw, or, carefully, with a tablesaw. Whatever method you choose, it is pretty much self-explanatory, with one caveat: If using a tablesaw it is VERY IMPORTANT to tape over the heads of the plugs prior to running the board through (I use painters tape, which I burnish down to the face over the plugs), as otherwise the plugs may want to come exploding out of the board like popcorn in a popper (this definitely falls into the “don’t ask me how I know this” category….). You should end up with something like this:
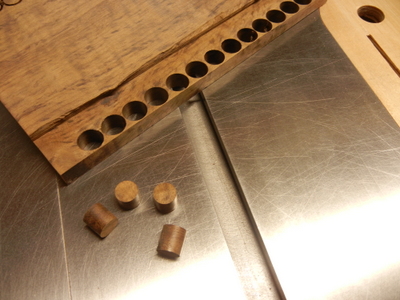
So that’s the male part of the equation. For the case sides, it is important that you drill your holes as cleanly and of consistent depth as possible. I would highly recommend a forstner bit for this (and preferably a drill press). With narrow case sides, it becomes especially important not to drill these holes too deep, which would greatly weaken or ruin the connection, but still deep enough for the screw head plus the plug over top. Test cuts on scrap are a good idea, as is careful layout to ensure that your screws penetrate the center of the shelf thickness. It is also a very good idea to dryfit the case after drilling the plug holes, ensuring the case is clamped square, then pre-drilling for the screws with an appropriately sized bit, or even better, a tapered bit of appropriate size . I used #9 x 2″ screws.
After assembling the case and driving the screws, add a touch of glue around the circumference of each hole, and with a few taps with a hammer, you’re plugged.
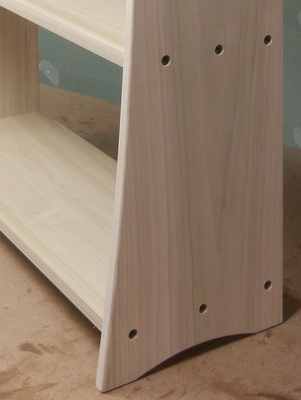
Once the glue sets up, I cut the plugs off as close as possible to the case sides with a small handsaw (the spine on a Japanese dozuki provides a guide for a consistent cut, and the fine teeth cut cleanly without tearing out the grain of the plug), then plane and/or sand them flush.
Another way to use this technique is to drill plugs out of the same wood species as the case itself, and to align the grain, which makes for plugs that are minimally visible, but in this case (no pun intended), I thought the choice to accentuate the contrast worked well.
beginner’s mind

“In the beginner’s mind there are many possibilities; in the expert’s mind there are few.”
–Shunryu Suzuki
The best lessons in life are often the most humbling ones. Here’s one of the best I ever got.
I first ran into Buddhism in high school, the way I ran into most things at the time—by reading about it. I found its ideas compelling, though if pressed I doubt I could have articulated the feelings behind my interest, other than some vague notions about discipline or self-mastery. I imagined being Buddha-like: to have perfect clarity of mind, to have complete mastery over emotions and desires, to be completely in control of body and mind, regardless of the situation at hand. That was appealing—my body, mind, emotions, and desires were all over the place—and that’s what I thought Buddhism was about. So, I continued to read about it, with the thought that I was coming closer to truly understanding it, at which point maybe I would be…………………ENLIGHTENED. Maybe the right combination of words on the page would finally unlock the mystery, and I would at last be able to see things as they really are, forever.
I tried to sit in meditation a few times over those years, on my own, but found it physically awkward and extremely uncomfortable, which were bad enough, but the worst part was that sitting still and silent for even a few short minutes was overwhelmingly oppressive mentally, as my mind maintained an unbearable torrent of thoughts the entire time. In short, I didn’t sit much, but boy, I thought about it a lot. So my practice, such as it was, remained an intellectual one.
That changed a few years later, when I moved to a city with a Zen center, where I received instruction in zazen (meditation) practice, and was able to sit with a group of fellow practitioners. The aura and rituals of the zendo were a strong motivating force, as was the need to remain silent and still for 40 minutes at a stretch, so as not to disturb those around me, so over time I became a semi-regular meditator. Yet all the old struggles remained; I just became better at enduring them for the requisite time period. Occasionally my thoughts would slow down, and my legs slowly adapted to sitting in half-lotus without hurting as much, but the thoughts (and the pain) always returned, sometimes with greater force than ever. Throughout, I kept my eye on the more senior practitioners, with their shaved heads, robes, and austere gazes, and tried to read them as I read books, trying to grasp their secret, to will myself to be more like them, or at least as I perceived them to be.
Then came the moment: One day after a meditation period, I was standing outside with a guest student at the zendo, commenting with surprise and dismay at what I perceived to be arrogant behavior coming from some members of the community. After a long moment of looking me in the eye, he asked me why I thought people at a Zen center would be any different than people anywhere else in the world. And he looked at me some more. The sun had just set, and a cold breeze had come in off the ocean. I remember an acute awareness of my shoulders being hunched against the cold, while he seemed impervious to it somehow. We were standing close together. He was from New Zealand, and spoke with an accent. He smiled at me. I was speechless.
It may not sound like much, but that moment remains one of the most vivid of my entire life, evidently because I was ready for it, and because of what it so plainly revealed to me about myself, and about this quest that I had been on for so many years. Buddhism wasn’t about being superhuman; it’s about being human. People at the Zen center weren’t there because they were uniquely evolved beings, but because they were uniquely suffering, just like everyone else in the world.
As the Buddha taught, the root of this suffering is our human compulsion to incessantly discriminate, to project our ideas about ourselves and the world out onto ourselves and the world, as if they had some objective reality. This is the trap of our having evolved the ability to self-reflect: not knowing how to stop objectifying all that we experience, based upon a mistaken understanding about the nature of the endless fountain of thoughts pouring out of our endlessly active minds.
The concept of enlightenment—-some kind of instantaneous (and permanent) transformation as presented in certain schools of Buddhism—-is undoubtedly the worst idea I picked up from my early studies of Buddhist philosophy. As long as you are busy looking for it, you are simply blinding yourself to whatever is happening now. What a meditation practice offers (to me at least) is the opportunity to notice and experience whatever feelings I’m having in the moment—boredom, pain, and oppressive thoughts (or bliss, pleasure, and ecstatic thoughts, for that matter)— so many times over that the impulse to believe in, indulge in, invest in, reject, or cling to them gradually diminishes. Which leaves—finally—some empty space to simply be present in. To see, hear, smell, taste, and touch without preconceived ideas. To maintain a beginner’s mind, despite what we think we know. Happy New Year.

tree to tabletop
For a woodworker, one of the great advantages of milling your own lumber is that it allows for the design and construction of pieces of furniture with boards all sawn from the same log (or at least same tree), ensuring matching colors, grain patterns, and working characteristics. Another great advantage, whether you hire the work out to a portable sawmill operator, or do the milling yourself, is the significant cost savings versus buying lumber from a hardwood distributor. The greatest benefits, however, are being able to work with wood of truly unique character, and knowing the story (and some of the history) of the tree supplying the wood.
When marking some trees in my woodlot to be felled in a Timber Stand Improvement (TSI) thinning in 2010, my forester and I came across a very tall and straight Red Maple, about 20″ in diameter (dbh), with a clear (branch-free) stem for the first 30 feet or so, and large crown. There are many like it in my forest. Historically, Red Maple was considered a low-value sawtimber species, and is a middling firewood with relatively low BTU value, so it was often spared during past harvests focused on higher value hardwoods, and often managed to grow into a dominant position in the forest canopy. By sheer numbers, Red Maple is the most common tree in New York state, and is a true generalist, able to grow and thrive on a wide variety of soils and sites. It can often be found as the only sizeable sawtimber species in forest stands otherwise severely degraded from repeated unsustainable harvesting practices.
If visually healthy and still vigorous, I am happy to leave such trees to continue to grow to their full maturity. In this case, the tree in question had suffered a substantial wound some years back; one of its upper scaffold limbs had died, or been sheared off in a storm or when a neighboring tree fell, and a visible rot column had developed along (and presumably inside) the trunk from the site of the wound downward—just how far down (and in), we couldn’t tell. In any event, this tree’s days were numbered, and its remaining value as sawtimber would only continue to decline over time. Felling this large stem would also release the crowns of some promising maples nearby from the shading provided by the substantial canopy of the wounded tree, so it was an easy decision to mark it for felling.
Once on the ground, it was clear that a significant portion of the upper stem was punky and rotten beyond use, either as firewood or sawtimber. The lower portion of the stem was sound, however, and I managed to salvage the two lowest 8 foot logs. While most commercial mills will saw a log ‘for grade’— maximizing commercial value by cutting around ‘defects’, leaving in most cases a large quantity of narrow boards with clear faces, even from large diameter trees—I sawed these two logs into full width slabs ranging from 1.25″ to 3.5″ thick, and stacked and covered them to air dry over the next year or so.
 After drying the boards outdoors to the extent possible, I brought them inside to fully acclimate to the relative humidity of my shop. They would finally be at equilibrium—stable and ready to be worked—at about 7.5% moisture content. In the interim, I had come up with a few designs for tables that would take full advantage of their unique characteristics.
The primary point of interest of this wood—at least for me—was the wide band of chocolate brown heartwood at the center of the boards. Often considered an unsightly defect to be discarded, this tree’s heart would instead become a focal point.

Another distinct feature of these boards would be their natural edges, which along with the heartwood/sapwood contrast are a vivid (and tactile) reminder that this board was once a tree—-all too easy to forget when looking at or working with squared dimensional lumber.
One additional feature of some of the boards—one that developed during the drying process, and that is most often cut away prior to working with lumber—is the presence of dramatic end checks that occurred as the ends of the boards released their bound moisture faster than the faces or inner portions. While this can be minimized by sealing the endgrain (with paint or wax) immediately after sawing a log into boards (envision the ends of a fistful of drinking straws and you have a sense of the ability of endgrain to conduct water in or out of a board versus facegrain), or by shading your lumber pile and protecting it from strong drying winds, it cannot be eliminated entirely. Some species are more susceptible than others; about one-quarter of my Red maple boards end-checked significantly.
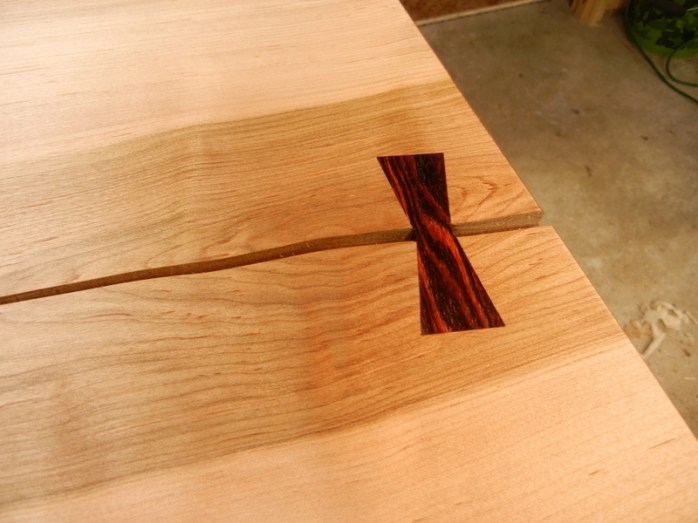
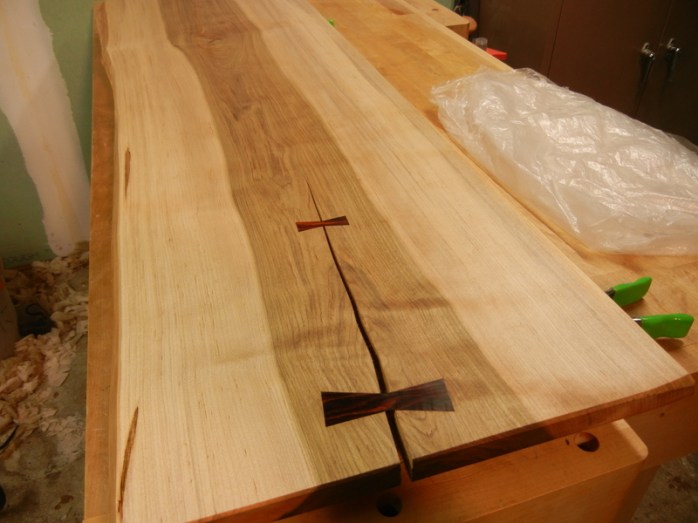
Rather than discard the cracked sections of those boards, why not accentuate them? While such a crack or check can cause instability or even failure of a wide board in a piece of furniture (most often used as a tabletop), this instability can be overcome with the use of an inlaid wooden ‘key’ (often known as a butterfly key) that runs perpendicular to the crack and serves to lock the two sides together. This technique, while certainly ages old, was popularized in the U.S. by the work of Pennsylvania craftsman George Nakashima in the second half of the 20th century.
In the years since some woodworkers have used the technique to excess for its visual effect (I have to admit that I was myself guilty of this on occasion earlier in my woodworking career); in my current approach, I have learned to use butterfly keys with restraint, and only for structural, rather than merely decorative reasons. Here’s what it looks like:
Here’s how it’s done (at least by me):
First, you have to cut a key. A common rule of thumb I’ve come across is that the key should not be longer than 3 or 4 inches, as it runs crossgrain to the board it stabilizes, and thus will move differentially with changes in humidity, and may want to work itself loose or otherwise cause problems. Nakashima often used very long and large keys in his furniture; my biggest have been around 4″ long with no evident problems. In designing a key, the angle is largely an aesthetic preference, though too steep an angle might make it more challenging to fit the key without damaging the corners. Nakashima seemed to prefer a shallow angle for his keys; the angle in the photos is ten degrees; I have also used 15 degree keys with no trouble.
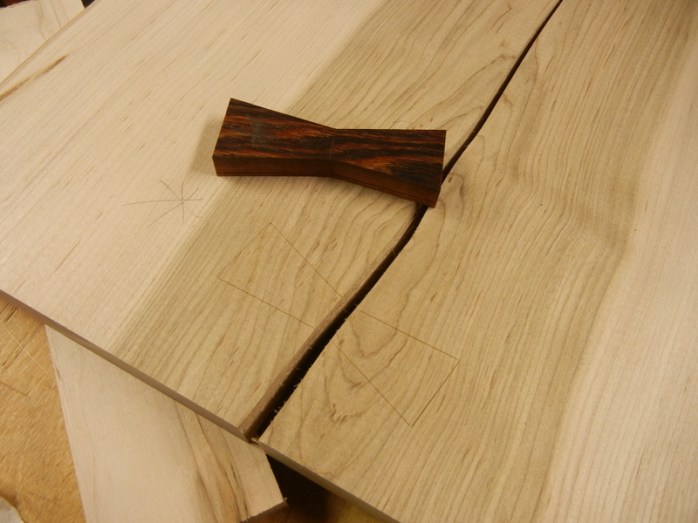
So mill and square your key wood (I used Cocobolo here)—as accurately as possible—then layout the keys. I laid out two side by side in this case, as seen in the photo below, and cut them on the bandsaw, with a simple jig (made of 1/4″ MDF, with a notch cut at 10 degrees) that rides the rip fence (see photo below). With careful layout, flipping the workpiece end for end, and upside down, will get you equal and symmetrical (and square-edged) keys.


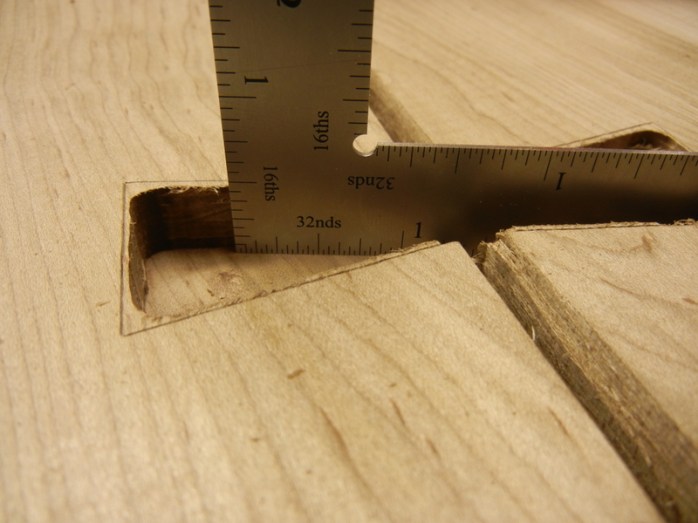
Next, carefully hold the key in its desired location and score around it with a sharp knife:
Be sure to mark and maintain the original orientation of the board and key throughout the process. Next, you could mortise entirely by hand, but I use a trim router with 1/4″ bit to remove most of the waste, staying clear of the edges. This saves time, and accurately establishes the depth of the mortise:

For this 1″ thick tabletop, I cut my keys at 1/2″ thick, and routed the mortises at about 7/16″ deep, leaving the key slightly proud to be planed off after glue-up.
Next, sharpen your chisels (!), then carefully pare up to your layout/scored lines. Use a knife to clean out the corners of the mortise as necessary–don’t crush the crisp angles trying to work your chisel in there. Test fit your key carefully (and shallowly). Some folks taper the edges of their key; I find it easier to test fit accurately if I keep it square; I subtly chamfer the bottom edges once I know it will fit snugly. What you want is not too loose, but not too tight. You will learn what this means with some (hopefully not too painful) experience. Take your time. I use a small brush to apply a light coat of glue to the mortise walls and bottom, and use a block (!) to drive the key home (you’ll be very unhappy with the result if you beat on the key itself—don’t ask me how I know this….)

This Lie-Nielsen 102 (great little plane!) made quick work of planing the key flush (although you could sand and/or scrape as well):

Here’s the final result, handplaned surfaces awaiting a first coat of finish:
Not exactly your ‘run of the mill’ tabletop………………….
‘vernal’ pools
In 2011, I applied for and received grant funding to implement a number of conservation and habitat improvement measures on my land. The funding came from the Conservation Stewardship Program (CSP), which is administered by the Natural Resources Conservation Service, a branch of the U.S. Department of Agriculture. If approved for funding, CSP activities are carried out over a five year period, and encourage a broad range of stewardship measures. In my case, as nearly the entirety of my land is forested, the focus of my Conservation Plan (which defines and guides the implementation of the program) is woodland habitat improvement, including such measures as:
- Forest stand improvement for wildlife (creating or conserving snags and/or den trees), and for soil quality (erosion control);
- Forest wildlife structures (brush piles, bat houses, nest boxes, etc.);
- Hardwood crop tree release;
- Restoration of rare or declining habitat;
- Riparian forest zone enhancement;
- Creation of shallow water habitat
The great thing about this program—-and other similar federal programs such as the Environmental Quality Incentives Program (EQIP) and the Wildlife Habitat Incentive Program (WHIP), among others—-is that you are being paid to do things on your land that 1) you may have been doing already; or 2) you always wanted to do but couldn’t justify or prioritize the expense. For me, this was particularly true with the construction of shallow water habitat, otherwise known generally as ‘vernal’ pools.
A ‘vernal’ pool is an ephemeral body of water that provides critical (and often lacking) breeding habitat for a diversity of species. I place the vernal in quotes because it refers to springtime, when such pools are commonly full when found in the open, and are most necessary for breeding (ver is spring in Latin); in reality, when found in woodlands, these pools are often equally full in the fall, depending on the rainfall in a given year. So a more accurate term in this case is woodland or seasonal pool.
In any event, there are a few key features that distinguish this type of aquatic habitat from others that may be present nearby:
- They periodically dry up, but are generally full for at least 90 days from late winter through mid-spring;
- They are lined with at least a semi-impermeable base, preferably of clay or silty loam, in order to temporarily hold the rain, snowmelt, surface runoff, or seasonally high groundwater that fills the pool;
- They contain no fish, which if present would prey voraciously on breeding aquatic organisms, such as occurs in a permanent pond;
- They average 6-30″ deep maximum, with varied topography, and contain a variety of organic materials (ie–leaf litter, stumps, roots, logs, rocks, etc.) to add habitat complexity, in addition to 30-50% coverage with aquatic vegetation.
While my land has a small creek running through it, as well as a permanent man-made pond (which harbors a population of introduced smallmouth bass), neither offer the unique combination of traits that define a seasonal pool. While perhaps most essential in the life cycles of reptiles, amphibians, and insects—they have been called the ‘coral reefs of Northeastern forests’ for their ability to support and sustain life, and are estimated to provide breeding habitat for half of all frog species and one third of all salamander species where present—seasonal pools can also provide an important water source for a variety of mammal and bird species during times of drought, or in areas where surface water is otherwise nonexistent.
Here is a site in my woodlot that I chose for one of the pools:

I chose this spot as the soils in this area remain wet throughout the year due to periodic surface runoff from above, as well as from a number of springs that flow even during dry spells. There is a fair amount of clay in the soil as well. The carpet of Spotted jewelweed (Impatiens capensis) in the photo is indicative of moist, rich soil (as are the Sugar Maple, Basswood, and White Ash in this forest stand).
It helps to know someone with a bulldozer, such as my neighbor who was kind enough to help out:


He first dug out the rough shape to an approximate depth, then created, compacted, and graded the berm that impounds the pool, leaving one side of the berm slightly lower than the rest to serve as a spillway to handle any overflow during times of high water. This all took place in August. A few weeks later, following a good rain, I went back up the hill with my camera and found this:

There were wood frogs leaping in and splashing around as I approached. Build it, and they will come, as the saying goes.
the empty mind of the hunter
Here’s the scene: Bright sunny October afternoon, slight breeze, 50 degrees, leaves falling, dead silence. I am perched 20+ feet off the ground in a treestand hung in a large Hemlock on the wooded hillside, camo-ed head to toe, compound bow in hand, doing my best not to move—or to think—anticipating the approach of any of the many deer that regularly pass through on the trail that snakes through the forest 15 yards away from my chosen tree. Depending on my physical and/or mental state, this scene is either a moment of bliss or torture. Dragging a bag of thoughts and worries up the hill usually ensures the latter; in this case sometimes better not to go out at all, as an empty mind is prerequisite for this type of close-range hunting. Thinking one’s way through a hunt ensures (at least for me) any number of distractions: boredom, hunger, cold hands and/or feet, all kinds of noisy fidgeting, bad pop songs incessantly playing in one’s mind; it also almost always ensures that you will miss the subtle sights and sounds of the approach of a deer, until it is too late to raise and draw one’s bow or gun without being detected. This kind of mental drifting leading to missed opportunities during a hunt has happened to me more times than I would care to admit.
This day is bliss, though; nowhere else I’d rather be, no agenda-driven thoughts. On this day, the deer are really just an excuse to spend a few hours forgetting about everything and simply existing, like a sated hawk or owl. No need to move, no need to think; receptive, present. Time loses its linear quality, becomes slippery and malleable—minutes seem to encompass hours, or hours slip by in minutes. Vision shifts and becomes panoramic, diffused, freeing the mind from its habituated responses to the world. The slightest rustlings in the leaf litter are magnified; the atrophied sense of smell becomes especially acute, dominated by the delicious earthy scent of fungal decay on the forest floor.
About 800 years ago, the founder of the Soto school of Zen Buddhism in Japan, Eihei Dogen, wrote the following:
To study the way is to study the self.
To study the self is to forget the self.
To forget the self is to be enlightened by all things.
In the modern world, sitting quietly, thinking nothing, doing nothing, which is for all of our animal cousins (and was surely for our tribal ancestors) the most common of daily activities, seems to be a lost art among our kind. I wonder if we know what we’re losing in the process. Hunting is one of few common rituals remaining that by its very nature requires a degree of meditative consciousness, a temporary forgetting of the self. Homo sapiens—literally ‘wise man’ (no hubris there!); maybe we’ve grown a bit too wise; so impressed with our own brains (and their creations) that we have forgotten how to just be, part of a much larger whole.
The poet Gary Snyder (in a poem called ‘Long Hair’) reverses our customary view of the hunt, describing it as a subversive means for deer to infiltrate human consciousness:
Hunting season:
Once every year, the Deer catch human beings. They do various things
which irresistibly draw men near them: each one selects a certain man.
The Deer shoots the man, who is then compelled to skin it and carry its
meat home and eat it. Then the Deer is inside the man. He waits and
hides in there, but the man doesn’t know it. When enough Deer have
occupied enough men, they will strike all at once. The men who don’t
have Deer in them will also be taken by surprise, and everything will
change some. This is called “takeover from inside.”
Here in New York, bow season starts in a few days. I am looking forward to again becoming a student of the Deer.

Tsuga canadensis part 1: the wood
Hemlock isn’t a glamorous wood. It is coarse, brittle, and full of splinters. It has no value as a furniture wood, it checks and warps significantly as it dries, often randomly splits apart where its growth rings meet, and its rock hard knots can dull or even chip the steel of sawblades or chisels—and will bend near any nail you attempt to drive into one (not to even mention what it takes to pull out a half-embedded bent nail from those knots). It would make a terrible firewood, as it has minimal Btu value, and throws off sparks that could start an unwanted fire elsewhere. Yet with all that being said, hemlock does have its own significant and unique values, both from utilitarian, and especially ecological standpoints.
Ironically, one of the earliest and most extensive uses of Eastern Hemlock (Tsuga canadensis) didn’t involve the wood at all. Hemlock bark is extremely rich in tannic acid (10-13%), which back in the day was essential in the tanning of leather. Entire forests of hemlock were felled in the pursuit of the bark, which was peeled and hauled to local tanneries, with the stripped logs most often left behind to rot. It is estimated that over 70 million hemlocks were harvested and peeled in the Catskill Mountains of New York in the 19th century, before synthetic tanning agents were developed.
While hemlock was surely always used to some degree by early Americans as coarse construction lumber (I’ve seen 24″ wide hemlock floorboards in 19th century farmhouses here in New York), it was historically a distant second softwood option, behind Eastern White Pine (Pinus strobus), which is a fine and stable cabinet/furniture wood, as well as an easily worked and high quality construction timber. These qualities led to White pine being drastically overharvested throughout the northeast during the colonial era; this, combined with the advent of a few devastating insect and disease problems, and the transition of many former pine forests to a mix of more shade tolerant hardwood species, have kept the pines from their former abundance and majesty. While late 18th century records speak of entire groves of pines at over 250 feet tall and 5 feet in diameter in my town, the tallest pines in all of the northeast U.S. no longer reach 160 feet in height. So, largely of necessity, hemlock has seen a resurgence in more recent times, as rough construction lumber, and particularly, as a barn wood.

In the picture above, which is a 6×6 post, in addition to the residual marks left from the circular blade that was used in milling the wood, you can clearly see the coarse texture of hemlock’s grain, with the light colored early wood and plainly darker summer grown wood of each annual growth ring clearly distinct from each other. Hemlock does not have any distinct color variation between heartwood and sapwood, as do pines, as well as most hardwoods. When used as framing lumber it is rarely kiln-dried before use, so arrives fresh from the mill in a very wet, very heavy state. It tends to smell a little sour and rank when green–unlike the fresh resinous scent of the pines–but becomes pretty well odorless once dry, at which point it becomes very light in weight, at just under 27 pounds per cubic foot (compare to air-dried White oak at 48 lbs./cu. ft.).
The two photos below show one of the often fatal flaws of hemlock: ring shake, which is (obviously from the images) a separation of the wood between growth rings, which at times will not reveal itself until a wet board or timber is already in service.


In addition to lower cost, and in many regions of the northeast more availability, two significant advantages of hemlock over pine for barns and other outdoor structures are that: 1) it tends to hold nails more securely than pine; and 2) hemlock, while not truly rot-resistant, holds up much better over time than does pine when exposed to the elements, such as in board and batten siding.

By the way, the picture above shows the proper way to install board and batten. Behind the battens there are 1/2″-3/4″ spaces between the boards (which are 12″ wide). The boards are fastened with two nails near the middle of the board only (here shown at about 3″ apart; it could be one nail in the middle for boards 10″ or less wide), with no nailing at the outer edges. The long nails that hold the 3″ wide battens in place run through the gaps between the boards before reaching the wall purlins, thus allowing the wide boards to expand and contract freely behind the battens with changes in humidity. Nailing these boards down tight (especially when still green or wet) would pretty well guarantee major cracks and splits where those nails restricted the inevitable wood shrinkage.
Another rule of thumb when installing hemlock siding is to orient the boards whenever possible with the heart of the tree facing out—the bark side in—in order to minimize the warping of the boards from pushing the battens away from the building. The reason this works is that while a board will always cup toward whichever side is driest (which is why if you leave a board on the lawn on a sunny summer day it will quickly curl toward the sun), all things being equal a board will most often cup away from the heart as it shrinks, which in turn is because wood shrinks more along its growth rings than across them. Put another way, in most all wood species, tangential shrinkage will be far greater than radial shrinkage, which is why quartersawn lumber is so much more dimensionally stable than flatsawn, but that’s a story for another day. You can see some of this in action in the photo below: heart is on the bottom, the board is warping upward, away from the heart. Install this board with the heart out, and it won’t want to push the battens away from the wall.

That’s it for the wood. Next time I’ll delve into the character and nature of the tree itself.
pole barn
I haven’t posted in a while, largely because I have been working away at building a pole barn in my backyard, which was desperately needed as an outdoor work and storage space. It’s done now, so I figured I would break back into the blog by first sharing some photos of the barn, and in my next post (coming soon) to talk in some detail about Eastern Hemlock—Tsuga canadensis—the local tree that provided all of the lumber for the project.


arbor day
Here in New York, today is Arbor Day. Founded in 1872 by J. Sterling Morton, after he had moved from the heavily forested state of Michigan to the treeless plains of Nebraska, Arbor Day encourages each of us to plant trees, to care for them, and to remember how essential they are in our lives. Over one million trees were planted on that first holiday, and untold billions more since, as Arbor Day is now celebrated all over the world. In the U.S., the national holiday takes place on the last Friday in April; in addition, each state holds its own Arbor Day celebration, with the dates determined by climate and suitability for tree planting.
While I can—and often do—talk about trees all day long, to anyone willing to listen (or unable to escape), today I wanted to share some images that for me speak louder than words. I took these two photos for their symbolic power—the first at Overlook Mountain near Woodstock, New York, at the site of an abandoned 19th century resort; the second at a cemetery along a roadside in Cortland, New York. Each spoke very profoundly to me at the time of the ephemerality of life, and of the role of trees in the endless spiral of birth, death, and renewal on earth.


