jeff joseph -- woodworker
handcrafted furniture from sustainably managed woodlands
tree to tabletop
For a woodworker, one of the great advantages of milling your own lumber is that it allows for the design and construction of pieces of furniture with boards all sawn from the same log (or at least same tree), ensuring matching colors, grain patterns, and working characteristics. Another great advantage, whether you hire the work out to a portable sawmill operator, or do the milling yourself, is the significant cost savings versus buying lumber from a hardwood distributor. The greatest benefits, however, are being able to work with wood of truly unique character, and knowing the story (and some of the history) of the tree supplying the wood.
When marking some trees in my woodlot to be felled in a Timber Stand Improvement (TSI) thinning in 2010, my forester and I came across a very tall and straight Red Maple, about 20″ in diameter (dbh), with a clear (branch-free) stem for the first 30 feet or so, and large crown. There are many like it in my forest. Historically, Red Maple was considered a low-value sawtimber species, and is a middling firewood with relatively low BTU value, so it was often spared during past harvests focused on higher value hardwoods, and often managed to grow into a dominant position in the forest canopy. By sheer numbers, Red Maple is the most common tree in New York state, and is a true generalist, able to grow and thrive on a wide variety of soils and sites. It can often be found as the only sizeable sawtimber species in forest stands otherwise severely degraded from repeated unsustainable harvesting practices.
If visually healthy and still vigorous, I am happy to leave such trees to continue to grow to their full maturity. In this case, the tree in question had suffered a substantial wound some years back; one of its upper scaffold limbs had died, or been sheared off in a storm or when a neighboring tree fell, and a visible rot column had developed along (and presumably inside) the trunk from the site of the wound downward—just how far down (and in), we couldn’t tell. In any event, this tree’s days were numbered, and its remaining value as sawtimber would only continue to decline over time. Felling this large stem would also release the crowns of some promising maples nearby from the shading provided by the substantial canopy of the wounded tree, so it was an easy decision to mark it for felling.
Once on the ground, it was clear that a significant portion of the upper stem was punky and rotten beyond use, either as firewood or sawtimber. The lower portion of the stem was sound, however, and I managed to salvage the two lowest 8 foot logs. While most commercial mills will saw a log ‘for grade’— maximizing commercial value by cutting around ‘defects’, leaving in most cases a large quantity of narrow boards with clear faces, even from large diameter trees—I sawed these two logs into full width slabs ranging from 1.25″ to 3.5″ thick, and stacked and covered them to air dry over the next year or so.
 After drying the boards outdoors to the extent possible, I brought them inside to fully acclimate to the relative humidity of my shop. They would finally be at equilibrium—stable and ready to be worked—at about 7.5% moisture content. In the interim, I had come up with a few designs for tables that would take full advantage of their unique characteristics.
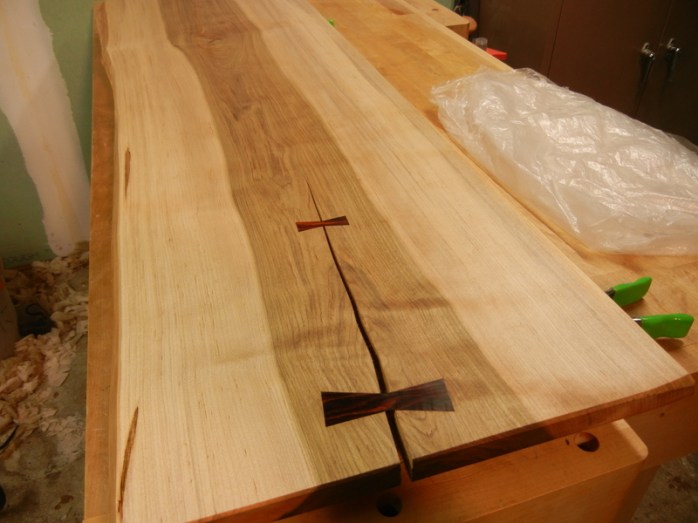
The primary point of interest of this wood—at least for me—was the wide band of chocolate brown heartwood at the center of the boards. Often considered an unsightly defect to be discarded, this tree’s heart would instead become a focal point.

Another distinct feature of these boards would be their natural edges, which along with the heartwood/sapwood contrast are a vivid (and tactile) reminder that this board was once a tree—-all too easy to forget when looking at or working with squared dimensional lumber.
One additional feature of some of the boards—one that developed during the drying process, and that is most often cut away prior to working with lumber—is the presence of dramatic end checks that occurred as the ends of the boards released their bound moisture faster than the faces or inner portions. While this can be minimized by sealing the endgrain (with paint or wax) immediately after sawing a log into boards (envision the ends of a fistful of drinking straws and you have a sense of the ability of endgrain to conduct water in or out of a board versus facegrain), or by shading your lumber pile and protecting it from strong drying winds, it cannot be eliminated entirely. Some species are more susceptible than others; about one-quarter of my Red maple boards end-checked significantly.
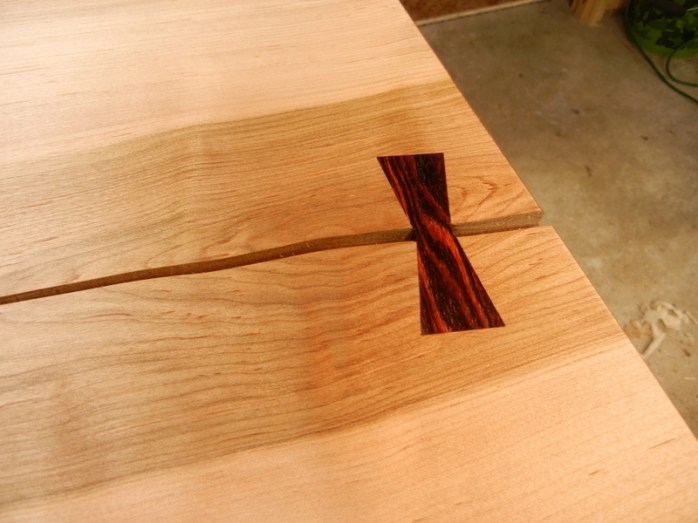
Rather than discard the cracked sections of those boards, why not accentuate them? While such a crack or check can cause instability or even failure of a wide board in a piece of furniture (most often used as a tabletop), this instability can be overcome with the use of an inlaid wooden ‘key’ (often known as a butterfly key) that runs perpendicular to the crack and serves to lock the two sides together. This technique, while certainly ages old, was popularized in the U.S. by the work of Pennsylvania craftsman George Nakashima in the second half of the 20th century.
In the years since some woodworkers have used the technique to excess for its visual effect (I have to admit that I was myself guilty of this on occasion earlier in my woodworking career); in my current approach, I have learned to use butterfly keys with restraint, and only for structural, rather than merely decorative reasons. Here’s what it looks like:
Here’s how it’s done (at least by me):
First, you have to cut a key. A common rule of thumb I’ve come across is that the key should not be longer than 3 or 4 inches, as it runs crossgrain to the board it stabilizes, and thus will move differentially with changes in humidity, and may want to work itself loose or otherwise cause problems. Nakashima often used very long and large keys in his furniture; my biggest have been around 4″ long with no evident problems. In designing a key, the angle is largely an aesthetic preference, though too steep an angle might make it more challenging to fit the key without damaging the corners. Nakashima seemed to prefer a shallow angle for his keys; the angle in the photos is ten degrees; I have also used 15 degree keys with no trouble.
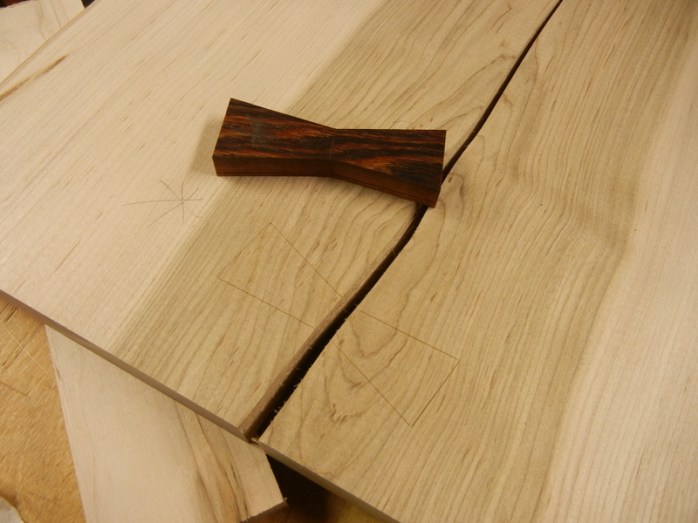
So mill and square your key wood (I used Cocobolo here)—as accurately as possible—then layout the keys. I laid out two side by side in this case, as seen in the photo below, and cut them on the bandsaw, with a simple jig (made of 1/4″ MDF, with a notch cut at 10 degrees) that rides the rip fence (see photo below). With careful layout, flipping the workpiece end for end, and upside down, will get you equal and symmetrical (and square-edged) keys.


Next, carefully hold the key in its desired location and score around it with a sharp knife:
Be sure to mark and maintain the original orientation of the board and key throughout the process. Next, you could mortise entirely by hand, but I use a trim router with 1/4″ bit to remove most of the waste, staying clear of the edges. This saves time, and accurately establishes the depth of the mortise:
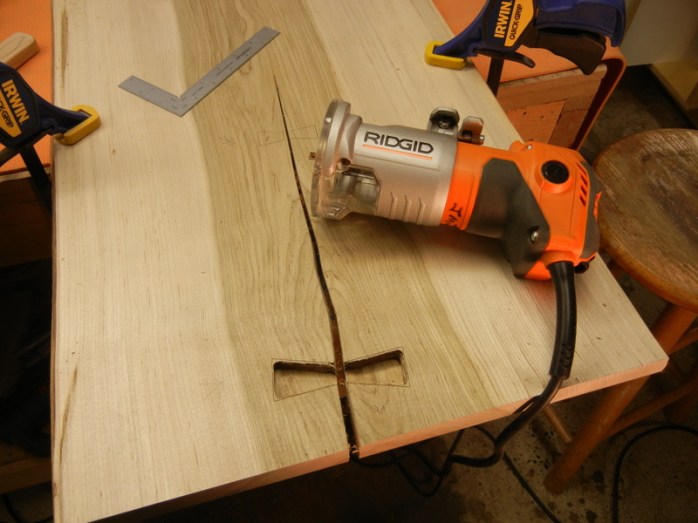
For this 1″ thick tabletop, I cut my keys at 1/2″ thick, and routed the mortises at about 7/16″ deep, leaving the key slightly proud to be planed off after glue-up.
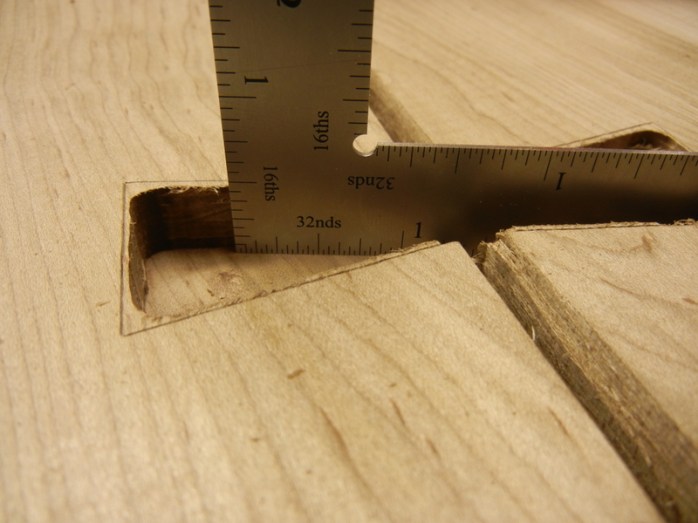
Next, sharpen your chisels (!), then carefully pare up to your layout/scored lines. Use a knife to clean out the corners of the mortise as necessary–don’t crush the crisp angles trying to work your chisel in there. Test fit your key carefully (and shallowly). Some folks taper the edges of their key; I find it easier to test fit accurately if I keep it square; I subtly chamfer the bottom edges once I know it will fit snugly. What you want is not too loose, but not too tight. You will learn what this means with some (hopefully not too painful) experience. Take your time. I use a small brush to apply a light coat of glue to the mortise walls and bottom, and use a block (!) to drive the key home (you’ll be very unhappy with the result if you beat on the key itself—don’t ask me how I know this….)

This Lie-Nielsen 102 (great little plane!) made quick work of planing the key flush (although you could sand and/or scrape as well):

Here’s the final result, handplaned surfaces awaiting a first coat of finish:
Not exactly your ‘run of the mill’ tabletop………………….


How do you tell if a natural check mark is okay to use, or if it will actually structurally make your table weak? Is there a general rule on that?
Great article, and makes me want to start making furniture! I think the most I will be making is some bookshelves with white pine boards, as we have a number of boxes full of books needing a home… Gotta love Amish rough cut pine!
Thanks for the excellent words…
Thanks Rick. As to your question, I have always just used my best judgment, and have sometimes stressed the board at the crack prior to working with it to see if it might want to split down the entire length…..In the tabletop shown in the post, I put two keys in because the crack was pretty long. The most important thing to be sure of is that your wood is fully acclimated to the relative humidity of your shop and/or its ultimate home before you start working. Every species is different with respect to the ease or difficulty of getting the lumber to release its moisture. The Red Maple I used in this post was relatively easy (as is Black Cherry, and Yellow Birch); air-drying Sugar Maple (and Beech and Elm, among others) has proven much more challenging in my experience. A hygrometer in the shop, and a moisture meter to check the moisture content (MC) of lumber prior to working it have saved me many headaches.
I love it!